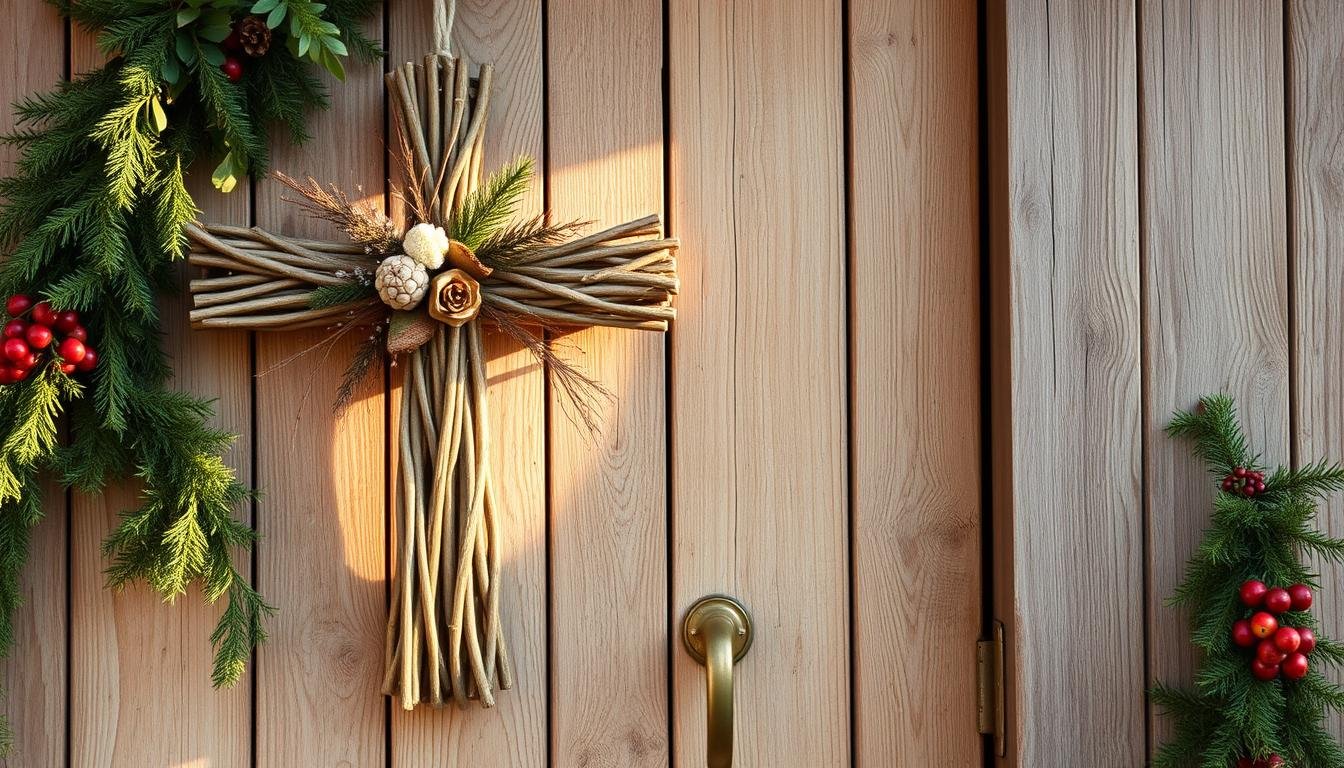
Making your own cross wreath is not just a fun crafting project. It’s also a special way to show your creative side and decorate your home. This walkthrough will help you create a stunning cross wreath from scratch. It’s easy enough for beginners.
You will need things like grapevine wreaths, greenery, and ribbons. In about 45 minutes, you’ll have a gorgeous, custom wreath. This project is great for Easter or any time of the year. Adding your own touches will make it even more special.
Key Takeaways
- Complete your cross wreath in approximately 45 minutes.
- Utilize simple materials like grapevine wreaths and greenery sprays.
- Incorporate 1.5″ and 2.5″ wired ribbons for added elegance.
- Make 8 simple steps to craft a beautiful homemade cross wreath.
- Perfect for Easter wreath making or year-round religious décor.
Understanding the Significance of a Cross Wreath
The cross wreath is more than just pretty. It carries deep spiritual and cultural meaning. For hundreds of years, religious wreaths have been a symbol of faith, hope, and beginning again. The Easter cross wreath significance is especially important in Christianity. It stands for Jesus Christ’s resurrection and the hope of new life.
During Easter, lots of families put cross wreaths on their doors to show their faith. This tradition makes homes look beautiful and gives people a chance to reflect and celebrate. Making a religious wreath is a truly special spiritual DIY project. It turns simple items into powerful signs of belief.
The Easter cross wreath often mixes greens and flowers. A usual design might include bamboo, rosemary, and other greens, plus Silk Snowball flowers, White Cherry Blossoms, and Queen Anne’s Lace. This mix of plants makes the wreath not just beautiful but also full of meaning.
Religious wreaths can also have materials that mean something spiritually. For example, using 2-3 yards of fabric to make a cross on a 14-inch foam base. Tying fabric strips by hand can be like saying a prayer or giving a blessing with each knot.
Making the wreath also involves things like zip ties, floral pins, and a steel pick machine for flowers. Adding decorations like floral wire and burlap ribbon adds even more meaning.
Joining a Wreath Making 101 Workshop can help you learn more. These workshops teach things like using different greens to make your cross wreath look and feel special. This way, your wreath shows your faith and is a unique artwork.
In the end, a cross wreath turns basic materials into a deep sign of faith. It becomes a beloved part of spiritual celebrations and personal thinking.
Choosing the Right Materials for Your Cross Wreath
Making a cross wreath starts with the right materials. First, get 1 Large Willow Wreath for the base. You’ll also need 1 Small Willow Wreath, sized for your burlap ribbon. The burlap’s length depends on the big wreath’s size.
You’ll want about 3 bundles of floral stems for decorations. Get these from Dollar Tree to save money. Also, a satin ribbon is perfect for a “Hope” banner.
To keep your wreath stable, put 3-4 tan-colored pebbles on the back. For making it, you’ll need scissors, wire cutters, and a glue gun. Use Acrylic paint to personalize the “Hope” banner.
Glue the cross at the top and sides, not the bottom. This leaves space for flowers. Lay out your flowers from top down, bending them to follow the wreath’s shape.
To hang your wreath, consider using a wire, ribbon, or a Command Strip Hook. Making this takes about 30 minutes. Extra flowers will cost about $15 total.
Your wreath will be about 21 inches long by 15 inches wide. A wider ribbon looks better. You might need chicken wire to keep everything together, with either two strips or a single piece overlapping by 1.5 inches.
Invite friends or family to add flowers, especially during Easter brunch. Easter wreaths are popular and brighten up your home. A Dollar Tree frame is a cheap option for your project.
Choosing top-notch materials is key to a great cross wreath. It will look good, last long, and stay balanced. Enjoy making it!
Step-by-Step Guide to Crafting Your Cross Wreath
Making a cross wreath can be a fun and deep project. With clear DIY wreath instructions, you’ll design a lovely decoration. It’ll bring a seasonal touch to your home. Check out this complete guide to learn how.
- Prepare Your Workspace: Choose a clean, bright spot. Have your materials ready: grapevines, shears, wire cutters, 22-24 gauge wire, and any extras for decoration.
- Soak and Shape the Grapevine: Let grapevines soak in water for a few hours to make them bendy. Shape them into a cross, putting the middle about one-third down the longer branch.
- Secure the Cross Shape: Tie the center with zip ties or wire. Let it dry for 1 or 2 days, depending on vine thickness and the air’s moisture.
- Create and Attach Bundles: Cut foliage into even bundles for a uniform look. Use paddle wire to tie greenery onto the grapevine, making sure it’s tight.
- Enhance with Decorations: Add your own flair with ribbons, flowers, and small trinkets. Favorites include lilies, daisies, and light, spring colors.
- Add Finishing Touches: Use an EZ Bow Maker for perfect bows. Check that everything is securely in place.
- Final Adjustments: Clip any too-long foliage and arrange decorations evenly for a good look.
If you are making a cross wreath for the first time or want to get better, these DIY wreath instructions are here to help. By following these step-by-step tips, your wreath will stand out. It will add a unique, cozy feel to your space.
For a longer-lasting wreath, try using a moss base. It keeps flowers fresh longer by holding moisture.
Learn more creative tricks and advice to improve your wreath-making abilities. Show off your special, handmade decorations.
Adding Personal Touches to Your Wreath
When you add your own touches to customizing DIY wreaths, they really stand out. You can make your wreaths unique by adding special ribbons, bright colors, and things that represent the season. This way, your wreath can show off what you like.
Start by picking 3, 5, or 7 items to make it look just right because odd numbers are more appealing. For example, adding faux boxwood stems to your wreath brings in a lush, green feel. If you’re working with a wreath form that’s 8 inches, using 2 out of 4 faux stems is perfect.
To give your wreath depth, use layering. You’ll need 4 to 6 layers of bendable branches to keep the shape. Make sure each branch is cut to at least 1/3 to 1/2 the size of your wreath base for strong support. This approach will make your wreath look full and professionally done.
| Element | Recommendation |
|---|---|
| Wreath Form Size | 8 inches for beginners |
| Number of Items | 3, 5, or 7 for visual appeal |
| Floral Tape | Versatile tool for arrangement |
| Boxwood Stems | 2 out of 4 for 50% usage ratio |
| Natural Jute Twine | 8-10 pieces, 12 inches each |
For a design that looks good together, it’s important to have symmetry. Taking a picture of your wreath as you work on it can help. Looking at your wreath through a picture lets you see if everything looks balanced. This way, you can make changes before you’re done.
Also, remember how useful and cost-effective floral tape and DIY can be. Making a boxwood wreath, for example, can cost less than $11. The end product is a quality decoration or a gift that feels personal.
The most important thing in personalizing cross wreaths is to let your creativity flow. You can use different herbs like bay, rosemary, thyme, and lavender for a kitchen herb wreath. Or choose themes that match the season to show what you love. Exploring all the creative ideas out there is the first step to crafting a wreath that’s all your own.
Care and Maintenance of Your Cross Wreath
To keep your cross wreath beautiful and long-lasting, you need to pay attention and use the right methods. Choosing materials that can handle the weather is important, especially for outdoor wreaths. This helps your wreath last longer.
Regular dusting is key for DIY wreath maintenance. You can use a soft brush or compressed air to keep it dust-free. If your wreath has natural parts like grapevines or dried flowers, update these now and then. Changing out dried flowers every few months keeps your wreath fresh.
Storing your wreath right is also very important. Keep it in a cool, dry spot when it’s not being displayed. Put it in a strong box to avoid damage and make sure it isn’t squashed under heavy things.
Here’s a quick guide on how to take good care of your wreath:
| Maintenance Task | Details |
|---|---|
| Dusting | Use a brush or compressed air for best results |
| Material Refresh | Replace dried flowers every few months |
| Storage | Store in a sturdy box in a cool, dry place |
| Weather-Resistant Materials | Choose materials that can withstand outdoor conditions |
To save money but still have a great wreath, you can find deals at Home Depot. They offer discounts on wood that might have small damage and free cuts for your wreath’s frame. Michael’s also has sales on crafting items often, so you can update your wreath’s look without spending much. With these DIY wreath maintenance tips, you can make your wreath last a long time.
Displaying Your Completed Cross Wreath
After working hard on your cross wreath, you’ll want to show it off right. Wreaths can make your home look more inviting. Here are some tips to help you display it well.
Hanging the cross wreath on your front door is a beautiful way to greet guests. Another idea is putting it above the fireplace. It adds a comforting feel to your living room.
You can also get creative by placing the wreath in a home prayer corner. Surround it with candles and Bible verses. Or, use it in holiday decor to celebrate special times of the year.
It’s important to hang your wreath safely. Be sure to use the right hooks or hangers that can hold its weight. Here are some tips to keep it secure:
- Attach a loop of ribbon or twine to the back of the wreath for easy hanging.
- Use multiple hooks or nails if the wreath is particularly heavy, to distribute the weight evenly.
- For glass or metal doors, consider using suction cup wreath hangers.
- Command hooks can be a great choice for indoor displays where nails are not desired.
Knowing the costs and benefits of different wreath options is also key:
| Item | DIY Cost | Store Price |
|---|---|---|
| Cross Wreath | Under $20 | $40 – $50 |
| Wire Hangers (Pack of Six) | Approximately $5 | N/A |
| Flowers (Per Stem at Dollar Tree) | $1 | N/A |
By using these tips, you’ll make a beautiful display for your wreath. It will catch everyone’s eye and spread joy.
Exploring Various Styles of Cross Wreaths
There are so many *types of cross wreaths* you can make. People often link these wreaths with Easter. They come in different *Easter wreath styles*, fitting many tastes and occasions. This makes sure your wreath is special.
First, if you like a rustic look, use natural stuff like silver spruce or holly. These can be found locally. This way, your wreath is not only special but also good for the planet. They break down naturally. For these, a 10-inch frame is just right and won’t break the bank for DIY lovers.
For a modern vibe, think about using shiny beads, metallic ties, or fake flowers. These choices are hot in today’s *Easter wreath styles*. Modern wreaths look best with evenly sized bundles, making them eye-catching.
The festive season is a perfect time to try out *seasonal wreath designs*. Workshops in London and the Cotswolds offer great ideas during this time, thanks to Daylesford locations. Making wreaths together can make the holidays more fun, bringing friends and family closer.
You can also go for a whimsical style. Think of adding fun stuff like colorful eggs or bunny toys that scream Easter. Using strong wire keeps your decorations in place. Plus, filling in spaces with small flowers makes your wreath look full and pretty.
And let’s not forget the traditional styles, which are always in. They use classic bits like rosehips and mistletoe. Tying everything with natural string or flax adds to its earth-friendly charm.
Here’s all you need to know about the materials and styles for different *types of cross wreaths*:
| Style | Materials | Special Features |
|---|---|---|
| Rustic | Silver Spruce, Ivy, Cedar | Eco-Friendly, Natural |
| Contemporary | Metallic Ribbons, Artificial Flowers | Modern, Uniform Bundles |
| Whimsical | Colorful Eggs, Bunny Figurines | Thematic, Playful |
| Traditional | Rosehips, Mistletoe, Rowan | Classic, Sustainable |
You can find inspiration for *seasonal wreath designs* in many places, like a workshop or community event. Keep local plants in mind when you look for materials. This focus on beauty and earth care will make your cross wreath incredibly special and meaningful.
Troubleshooting Common Wreath-Making Issues
Even pros face common wreath-making errors that may slow them down. When making your cross wreath, you might notice ribbon loops that are not even or decorations that fall off. Let’s dive into some simple DIY wreath tips to solve these issues.
One big problem is material fraying. Using wired ribbon helps keep edges clean. If fraying starts, just put a bit of clear glue on the edges. This stops more fraying and keeps your wreath looking good.
Decorations falling off is another issue. When attaching decor, whether with hot glue, floral wire, or other methods, make sure it’s really secure. Mixing these methods often gives the best hold. And, don’t be afraid to try different ways if something isn’t working right.
Finally, think about where you work. A tidy place and the right tools help avoid many wreath-making problems. Always have scissors, pliers, and other important tools close by for quick fixes.