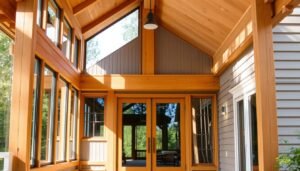
Want to turn your outdoor area into a snug retreat? Making your deck a screened-in porch lets you enjoy nature minus bugs and bad weather. It’s great for upping your home’s value or just kicking back. Our easy guide and tips will show you how to create a porch that fits your life and wallet.
Key Takeaways
- The average cost to convert a 12’x12′ deck into a screened porch ranges from $2,000 to $4,000.
- Complex designs can significantly increase costs.
- DIY projects can save money if you have the necessary skills.
- Screened porches can add 50% to 80% of project costs back to your home’s resale value.
- Fiberglass screening is more expensive but resists mildew; aluminum is cheaper but more prone to dents.
Benefits of a Screened-In Porch
Turning your deck into a screened-in porch offers many great benefits. Advantages of screened in porch include keeping bugs out. This allows you to enjoy your outdoor space without the annoyance of insects. Plus, a screened-in porch protects you from light rain and some weather, so you can use your porch more often throughout the year.
But there’s more to it than just keeping bugs away. Screening a 200-square-foot porch costs about $2,085 on average. This is much cheaper than building a new porch, which can cost around $14,400. Also, a screened porch can make your home more attractive to buyers. This can increase your home’s resale value.
Adding a screened porch also gives you more space to use outside. It’s a great spot for eating, relaxing, or growing plants safe from the cold. While it doesn’t add to your home’s square footage for appraisals, it does make your home look better. This can make your house more appealing to people looking to buy.
The materials you choose for your porch are important too. Composite materials are best because they don’t rot or splinter and are mold-resistant. Thus, they need less upkeep than wood. This means your screened porch will stay in good shape longer, with less work from you.
A screened-in porch adds so much to your home. It brings comfort, versatility, and defense against the elements. Plus, it could boost your home’s overall worth and attractiveness.
What You’ll Need for the Project
Getting ready to build a screened-in porch requires good planning and the right stuff. This task takes several days and is pretty tough, so you need to be really prepared. Having a complete building a screened porch checklist is key.
First, you need to collect some tools like a circular saw, drill, reciprocating saw, and table saw. You should also have basic carpentry tools. Make sure to check the building codes in your area and get any permits you need. For example, find out how deep the frost line is by talking to your local building department.
Building a screened porch happens in two big steps: making the porch itself and then putting in the screens. When building, you usually place joists 16 inches apart, which most local codes agree with. Adding screens often doesn’t require extra permits unless you live in a special area.
For such a big task, think about spending between $501 and $1000 on materials and other supplies. You’ll need things like 5 concrete form tubes, 20 two-by-eights, 10 two-by-tens, and 9 two-by-sixes. Each screen is about 4 feet by 8 feet. For a 32-foot porch, you’d need around 8 panels. Don’t forget to space the 2x4s horizontally at 10 inches from both the top and bottom of the wall.
When framing doors, you’ll use 1/2 x 2 inches wooden stops. To keep everything in place, use 3-inch metal braces and bolts you can remove to adjust the screens. Every screen panel gets attached with two 3 1/2-inch bolts to hold up against the weather.
A typical porch roof has a slight slope, dropping 4 inches for every 24 inches it extends. Once you’ve got all your materials and tools, follow a 21-step guide to finish your project. Renting scaffolding for the roof work can help a lot. A good building a screened porch checklist makes sure you don’t miss anything.
Using new materials like tough aluminum or vinyl-coated polyester for your screens can make your porch last longer. These materials are now 50% more durable, perfect for all kinds of weather.
By following these tips and advice, you’ll be on your way to creating a great screened porch. This will turn your deck into a cozy and welcoming spot.
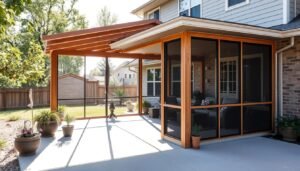
Preparing Your Deck for Screening
Before making your deck a cozy screened-in porch, you should first prepare it well. Getting it ready creates a strong base for your new outdoor area. This makes it last longer and look better.
Start by checking the deck’s foundation to see if it’s strong. You need to know if it can hold extra weight like a roof. It’s important to fix any problems so nothing goes wrong later. You might need to talk to a pro to make sure it meets all the rules.
Thinking about making your deck bigger? This can cost more. Setting a budget early helps you control your spending on materials and labor. Companies like Patio Enclosures have payment plans to make it easier on your wallet.
For the floor, look at using concrete, composite, or special wood boards. These choices help keep bugs away and are easy to take care of. Composite boards are pricier but don’t need much upkeep and keep insects out well.
Don’t forget to get any permits you need before starting work. You often need permits, and rules can change. Getting the right permits stops legal problems later.
Here’s a quick comparison of different screening materials:
| Material | Pros | Cons |
|---|---|---|
| Fiberglass | Affordable, widely available | Prone to UV damage and tears |
| Aluminum | Strong, rust-resistant | Can dent easily |
| High-Visibility | Nearly invisible view | Higher cost |
| Pet-Resistant | Durable against pet damage | Pricier than standard options |
| Solar | Deflects or absorbs heat | Limited color options |
Proper deck prep is key to a great screened porch. With careful planning, you’ll create a lovely, bug-free spot to hang out.
Selecting the Right Screening Material
When you’re looking into choosing porch screens, knowing the different materials helps a lot. This knowledge improves your porch’s use and look. Let me guide you in finding the best screening materials for porches.
Fiberglass leads the pack with choices in colors and less sun glare. It’s also easy on your wallet, making it great for those saving money. Its wide use comes from being both adaptable and inexpensive.
Aluminum screens cost more and can get dents and rust in wet or coastal areas. Yet, aluminum is more lasting than other metals. This makes it a go-to choice for certain jobs.
PVC-coated polyester is tough against pets and wears well over time. Its ability to cool makes it perfect for sunny spots or warm places, giving you comfort that lasts.
Specialty Options:
- Stainless Steel: Doesn’t rust, strong, and great for busy spots but might be too shiny in the sun.
- Brass: It’s bendy and looks good but costs more and doesn’t do well with sea salt or air conditions.
In the battle of fiberglass vs aluminum screens, fiberglass wins for its balance of toughness and price. Aluminum, however, stands out for its strength in projects that last. Check the table below to quickly compare your choices:
| Material | Advantages | Considerations |
|---|---|---|
| Fiberglass | Wide variety of colors, minimizes glare, cost-effective | May not be as durable as metals |
| Aluminum | Durable, more robust than fiberglass | Prone to denting and corrosion, higher cost |
| PVC-coated Polyester | Pet-resistant, heat-dissipating, less susceptible to wear | Higher initial cost |
| Stainless Steel | Strong, rust-resistant, better for high-traffic areas | Significant glare under sunlight |
| Brass | Flexible, stylish | Expensive, susceptible to corrosion |
By looking at these options and thinking about your needs like pet-resistance or if you live in a damp area, you can pick the ideal screen for your porch. This choice will add to its beauty and function.
Step-by-Step Guide to Building the Porch
Are you thinking about turning your deck into a screened-in porch? This DIY guide is here to help. We’ll go through all the steps to build your porch. With some planning and the right tools, you’ll create a great living area outside.
- Gathering Supplies: Make sure to collect the 12 essential carpentry tools. These include things like a circular saw, drill, and miter saw.
- Estimating Costs: Building it yourself can cost between $501 to $1,000. Doing it on your own saves money on labor.
- Planning and Permits: Remember, 80% of cities need permits for this work. Check your local rules to avoid any trouble.
Once you have your materials and tools, you can start transforming your deck into a porch:
- First, build the frame with 2×4 lumber. Place horizontal bands 10 inches from the wall’s top and bottom.
- Then, choose and install quality framing materials. Wood is common, but aluminum lasts longer with less upkeep, yet it costs more.
- For safety and ease, use a rolling scaffold system for at least a month when working high off the ground.
Building a good DIY porch means getting your measurements right and following steps carefully. You might have to adjust things like the door several times.
Building may take a few days because it’s quite a detailed project. Split the work into phases—framing, screening, and adding final touches to make it faster.
Remember to keep an eye on your spending. A small screened-in porch starts at $1,000 to $3,000, larger ones can go up to $8,000. This investment increases your home’s living space by 20% and can return about 60% of your costs if you sell.
Last but not least, take good care of your porch. Regular cleaning and sealing can keep it in prime condition for 15 to 30 years.
Decorating Your New Screened-In Porch
After building your new screened-in porch, it’s time to make it a cozy part of your home. Decorating this area gives you many chances to create a stylish outdoor space. We’ll look at smart porch furniture ideas and outdoor decor to make your porch better.
The 2023 Southern Living Idea House in Tennessee features Phantom Screens. These screens can be easily adjusted, offering protection and style. A ceiling fan is also smart for its look and comfort, especially where it’s hot and sticky.
Choosing the right furniture is key. Pick weatherproof pieces like teak or treated wood for their durability against the weather. Pick furniture that’s easy to clean, like the ones on an Oxford, Mississippi porch, for longer use and less work.
Think about furniture that has more than one use. A small 130-square-foot porch looks great with four chairs and a rug, making it perfect for morning coffee or evening drinks. A two-story porch in Sewanee, Tennessee, shows that big porches can become the main spot for gathering in a mountain home.
Decor is important for your porch’s look. Think about adding a fireplace to use it any time of the year. Colorful rugs and water-proof decor like ceramic pieces and plants will make it look great.
To help you decide on decorations, here’s a list showing different porch decor:
| Element | Examples | Benefits |
|---|---|---|
| Furniture | Teak chairs, treated wood tables | Durable, weather-resistant |
| Fabrics | Easy-to-clean upholstery | Low maintenance, great for outside |
| Accessories | Indoor-outdoor rugs, ceramic objects | Makes it pretty, adds color |
| Lighting | Ceiling fan, ambient lighting | Useful, sets the mood |
Remember, decorating a screened-in porch lets you mix nature and comfort. It turns it into a lovely escape in your home. With these tips, your porch will be the best place to relax and have fun with friends.
Maintenance Tips for Your Screened-In Porch
Keeping your screened-in porch comfy and lasting long means doing some key tasks. It’s not just about daily cleaning. It involves a proactive way to clean and keep up its many parts. You should start with a regular cleaning plan to stop dirt and pollen from building up. This keeps your space cozy and looking good.
Start cleaning deeply twice yearly, best in spring and fall. Use a hand-held, battery-powered leaf blower or sweeper first. The Libman Tornado Mop is great for these cleanings. Its polyester yarn doesn’t hold odors and reaches tight spots. Mop every 2-3 weeks and spot clean as needed, especially where people and pets walk a lot.
For longer-term care, woods like cedar need resealing every 5 to 7 years to stay strong. Use WD-40 on squeaky screen doors for silent operation. Also, touch up any caulking to keep bugs out. With the average cost to screen in a porch at about $2,800, picking tough materials saves on upkeep later.
Regular use, like eating outside or hanging out with pets, can wear your porch out faster. This shows why keeping up with maintenance is crucial. For more tips on keeping your porch in top shape, see our full guide at maintaining a screened porch. By keeping up with cleaning and care, your screened-in porch will stay a peaceful, welcoming space for years.