Looking to make your outdoor area safer and more beautiful? Crafting a DIY porch gate is a great project. It adds security for pets and kids and is a fun, low-cost project for the weekend.
The journey from picking the best materials and tools to mastering the build and install is all mapped out here. This guide is perfect for those keen on making their own gate and who enjoy woodworking projects.
If you’re an experienced DIY enthusiast or a beginner wanting a rewarding task, this guide is here to help. You’ll learn how to make a sturdy, good-looking gate without spending much. Simple steps and budget-friendly materials mean your porch gate will not only work well but look good too.
For a detailed walkthrough on building a porch gate, keep reading. You’ll find valuable tips and must-know info.
Key Takeaways
- The gate frame should be assembled on a flat surface to ensure structural integrity.
- Deck pickets should be spaced 5 inches on-center to comply with building codes.
- Use a #10 x 3-inch Spax screw for fastening 2×6 to the wall for masonry connections.
- A diagonal brace prevents sagging, ensuring long-term durability.
- Consider specific hardware design that allows the gate to stay open and closed easily.
- The project may require various fasteners, including 2 ½-inch screws and lag screws.
- Test fit and adjust the gate to provide a 1/2-inch clearance using a power hand planer.
- Utilize planning tools like SketchUp to improve project accuracy and outcomes.
Understanding Your Porch Gate Design Options
There are many porch gate designs, each with unique benefits. It’s important to consider your needs before picking. Choices range from boosting security to adding beauty. In the US, a deck gate’s top rail must be 36 inches high off the deck surface for safety and code compliance.
Think about including self-closing hinges in your porch gate plan. These hinges help prevent the gate from being left open by mistake. Products like Cornerstone Nylon Self-Closing Hinges and Aluminum Adjustable Tension Self-Closing Gate Hinges keep your gate securely shut.
When choosing gate features, don’t forget about secure locks. Lockable latches such as the Keystone X2 eXterior Mount Latch and LokkLatch Magnetic Latch boost security. They help reduce the chance of unwanted entry into your property.
Many deck gate kits are designed for easy setup. They include pre-made baluster openings or slots. Let’s explore various materials and their advantages:
| Material | Benefits |
|---|---|
| Wood | Natural look but requires regular maintenance. |
| Aluminum | Rust-resistant and lightweight, ideal for coastal areas. |
| Vinyl | Maintenance-free and modern-looking. |
| Steel | Strong and durable, though needs protective coatings to prevent rust. |
| Glass | Provides an unobstructed view, enhancing visual appeal. |
Porch gate designs do more than just use different materials. Adding elements like privacy panels or stylish aluminum makes a big impact. With the right combination of function and design, your porch gate will be a highlight of your home’s exterior.
Tools and Materials You’ll Need
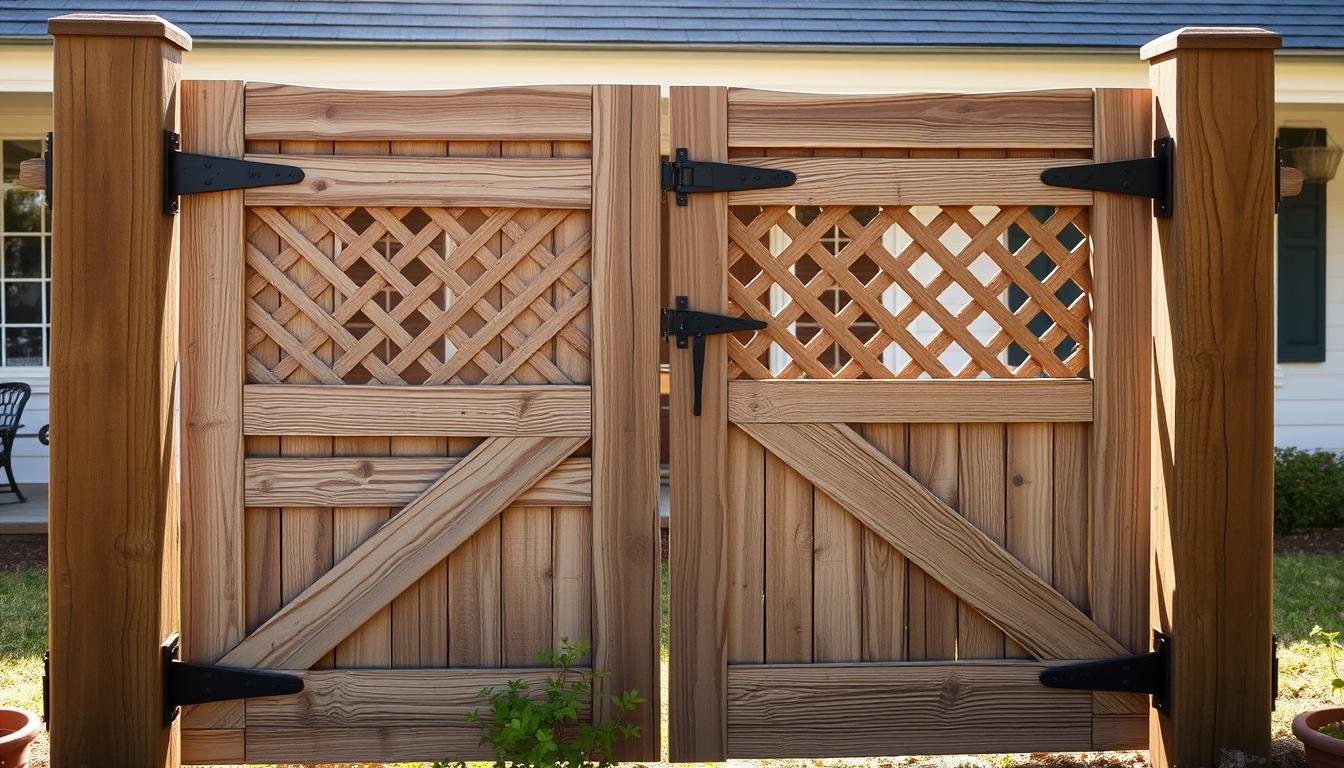
Making your own porch gate is a rewarding project. Knowing which tools and materials to use is crucial for success. You’ll need 2x4s, fence pickets, screws, and hinges for construction. Cedar, redwood, or pressure-treated lumber are best for outdoor durability.
First, collect your tools: a power drill, level, tape measure, saw, spanner set, screwdriver set, hammer, and shovel. These tools help build a sturdy and functional. The materials usually cost between $125 and $160.
For securing the fence pickets, use 1-5/8 inch exterior wood screws. You’ll need six screws per picket. Place two screws in each the top rail, the diagonal brace, and the bottom rail.
To install the gate latch, position it two-thirds up the fence. Also, leave a 1/2 inch gap between gate and fence pickets for expansion.
Paying attention to detail makes your porch gate last longer and perform better. Always predrill holes with a 3/16 inch drill bit before screwing. This prevents wood splitting.
With careful planning and the right materials and tools, your DIY gate will be both functional and beautiful. For a detailed list of materials and tools, see this comprehensive guide.
Step-by-Step Instructions for Building Your Porch Gate
Building your own porch gate is rewarding. Begin by collecting all needed materials and tools as mentioned earlier. Use the steps below for a strong and lasting gate.
- Measure and Cut the Frame: Get two 2×4 lumber pieces, each 8 feet long. Trim them to match a width between 36 to 48 inches, the ideal size for a porch gate. Remember to allow space: 1/2 to 3/4 inch on the sides and about 2 inches at the bottom.
- Assemble the Frame: Connect the pieces with three-inch wood screws. For extra strength, use four metal corner braces at every corner. The total size of the top and bottom boards should be about 7 inches, giving needed reinforcement.
- Add Balusters: Cut the balusters into 8 lengths, each 1 1/2 x 1 1/2 inches. Fix them to the frame, keeping the space under 4 inches. This is key for safety to prevent any gaps wider than 4 inches.
- Install the Cap Board: Choose a 5/4 x 5 1/2 inches cap board. Fasten it using 2 1/2-inch exterior screws. Place screws one inch from the ends and every 12 to 16 inches along the board.
- Sand and Smooth: Sand any rough spots with 100-grit sandpaper. This makes the gate safe and good-looking. After sanding, clean off the dust to get it ready for the final touches.
Next, fix the gate with two or more hinges. Having another person help with the installation ensures it is done right. This helps the gate hang correctly and work well.
By following these steps and selecting proper materials, you’ll quickly have a strong and nice-looking gate. Look back to these instructions if you need help during building. To make sure your gate lasts, remember to do yearly upkeep and repairs.
Tips for Installing Your Porch Gate Safely
To install your porch gate safely, make sure to use a reliable porch gate installation guide. Following the best practices is key to ensuring the gate is secured well. Here are important tips to guide you:
- Measure Twice, Cut Once: Getting your measurements right is crucial. Your gate should be at least 29 inches high and about 44 inches wide for stability. It should also be 1 inch narrower than the opening.
- Use Quality Hardware: Choose an 8-inch hinge for best support, which is about 1/5th of the gate’s length. Spending around $15 on a strong latch and hinge kit is important for secure installation.
- Proper Spacing: Keep a gap of 2-3 inches between the gate and post. Space vertical balusters as your deck railing, usually fitting about five balusters.
- Reinforcement Matters: Use braces, about 9 inches long, on each leg for more strength. Consider an anti-sag kit to keep the gate from drooping, if it looks okay.
- Join Board with Pocket Hole Jig: A pocket hole jig helps make connections tighter. This ensures screws hold each baluster well, with usually 2 screws per baluster recommended.
- Drying and Sealing: Let pressure-treated wood sit for 2-3 weeks before sealing. This helps hardware last longer by preventing early wear.
By following these steps, your porch will have a secure gate installation. Keep your family safe by making sure your gate is sturdy and lasts long.
Maintenance and Care for Your Porch Gate
A well-maintained porch gate is not just good to look at; it also makes your gate last longer. Taking care of it keeps your gate working right and safe. Cleaning your gate from time to time is very important. If your gate is made of vinyl or aluminum, cleaning it with a gentle soap and water works. Make sure to rinse it well so no soap is left behind.
Wooden gates need a bit more work. Check your wooden gate for damage like loose screws, cracks, or mildew at least twice a year. You should clean it every year with a soft soap and water. Remember to rinse it off well. Also, putting a sealant on your wooden gate every few years keeps it safe from the weather. Do this when it’s not too hot or too humid, ideally between 50-90°F.
It’s a good idea to use self-closing hinges and locks for more safety. Hinges like the Cornerstone Nylon or Aluminum Adjustable Tension make sure your gate closes by itself. A lock, especially near pools, keeps unwanted visitors out and makes things safer. Also, let’s not forget the top rail of the gate should be at least 36 inches off the ground. This is to follow safety rules in the United States.
Keep your porch gate in top shape by tightening screws and replacing any broken parts. This will help your gate last a long time, keeping it looking good and working well. With regular care, your porch gate will welcome guests with both beauty and safety for many years.