Jacking up a porch roof might sound tough, but it’s doable with the right guide. Porch repair keeps your home strong, important because porches can sink from soft soil and water damage. Fixing these problems fast stops more harm and saves money. Here, we’ll show you how to lift a porch roof without risks, offering smart tips and approaches.
Key Takeaways
- Long-standing experience in porch repair indicates the need for expertise.
- Soil conditions play a crucial role in porch stability and the need for repairs.
- Gaps or cracks between a home’s foundation and porch are common and should be addressed.
- Concrete leveling offers a cost-effective alternative to complete porch replacement.
- The process of jacking up a porch roof must be done gradually to ensure safety.
- Permits may be required and can range between $1,000 and $5,000.
- Combining piers and concrete leveling might be necessary based on the severity of the settling issue.
Understanding the Need to Raise Your Porch Roof
Many reasons exist for lifting a porch roof, such as fixing structural issues or making it look better. One key reason is to solve sinking or settling problems. These issues can cause uneven floors and weaken your porch’s structure. For example, wooden porch columns might sink by an inch due to rot. Fixing this early prevents worse damage and keeps your porch stable.
Renovating your porch roof is crucial to keep your home safe. Water damage can hurt your porch’s structure a lot. To fix these issues, sometimes you need to lift the roof. This is to replace parts that are rotting or too weak. Also, the base of porch posts might need to go deeper into the ground, sometimes 42 inches deep, depending on local rules.
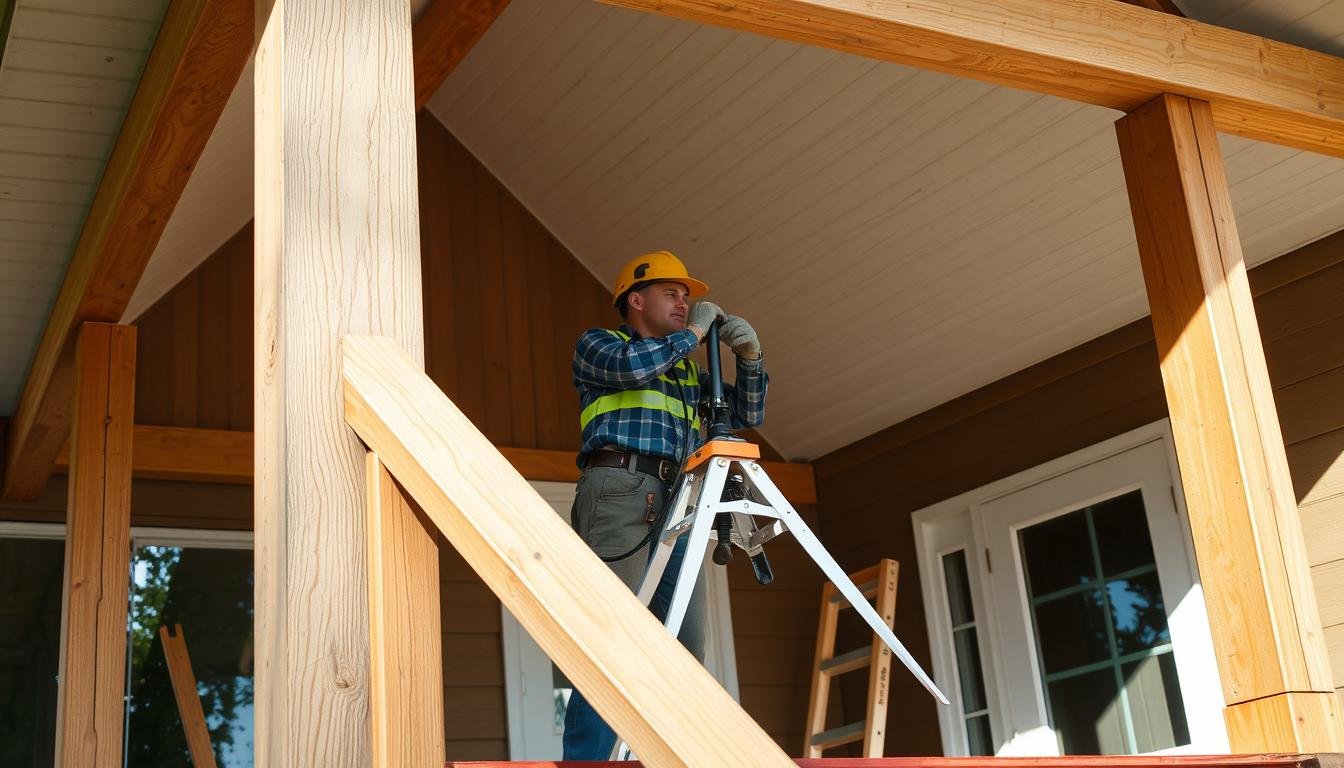
When improving your porch, it’s important to get the height right for safety and looks. Special tools like post jacks might be needed to lift the roof properly. These jacks can lift up to 18,000 lbs. The height adjustment for a post jack should be no more than 5 inches off from the beam of the porch. Also, you’ll need temporary supports made from strong materials to hold everything up while you work.
Improving your porch means making sure it meets safety requirements. This includes putting up guardrails that are 36 to 42 inches high. You should also use strong adhesives to attach columns correctly without harming the surface underneath. And, using nails that won’t rust helps keep everything securely in place. These steps are part of a successful porch roof renovation.
Gathering the Necessary Tools and Materials
Before you start renovating your porch, make sure you have all the needed tools and equipment. It’s important for the success and safety of lifting your porch roof.
First, knowing which tools are needed to lift the porch roof is key. A bottle jack is critical for the lift, working with little effort. A reciprocating saw, with its 10-inch wood-cutting blade, is perfect for precise cuts. You also need a miter or circular saw for the right angles, plus scribes and a pencil for marking. Don’t forget a router with bits for neat, detailed cuts.
Next, you need the right materials to support the porch roof. Wooden posts are important but require regular checks to avoid rot. Have extra wooden posts ready, or consider metal posts or rice hull boards for longer-lasting support.
To sum up the needed tools and materials, have a look at this detailed table:
| Tool | Purpose |
|---|---|
| Bottle Jack | Lifting the porch roof |
| Reciprocating Saw (10-inch blade) | Makes precise cuts in wood |
| Miter/Circular Saw | Accurate angle cuts |
| Scribes & Pencil | Marking specific measurements |
| Router and Bits | Detailed and clean cutting |
| Wooden or Metal Posts | Structural support for the porch |
| Rice Hull Boards | Weather-resistant wood for durability |
Remember, checking your porch regularly helps avoid big repair costs. Always wear protective gear to stay safe while working. By following these tips, you’ll be set to lift your porch roof safely and well.
Safety Precautions Before You Begin
Starting a project like lifting a porch roof requires a focus on safety. It’s vital to make the worksite safe to avoid common accidents. Key preventive measures in roof jacking include wearing the right safety gear. Always have on a hard hat, safety glasses, and work gloves to protect against dangers.
First, give your ladders a thorough check. Every year, over 250,000 people are hurt in ladder-related accidents, showing how crucial ladder safety is. Make sure your ladder is stable and tall enough to access your work area without stretching. Keep a 3:4 ratio when setting up your ladder: for every four feet up, the base should be one foot from the wall.
Then, assess your porch roof’s structural integrity. Roof jacks, which come in plastic or metal, are vital for their durability and weather resistance. To install, hammer two 16d nails into a rafter, making sure the plank extends six inches on each side. Regularly maintaining and replacing roof jacks prevents expensive repairs later on.
Other vital preventive measures in roof jacking are about understanding your porch roof’s load capacity. Think about the dead load, live load, wind load, and snow load. These checks ensure the structure can safely hold the required weight.
Finally, don’t forget to look over DIY porch roofing safety tips. Clear your work area of any tools or materials you don’t need to avoid tripping. Have a way to communicate with any helpers, using signals to coordinate lifting and to highlight any problems. Think ahead about electrical needs like lighting and fans. Getting permits helps you follow local codes and avoid problems with insurance claims later.
Preparing Your Porch for Lifting
Getting your porch ready for a roof lift is key. The first step is to check the porch columns. They support a big part of the roof’s weight. Problems like shifting foundations and rotting wood can make the porch roof sag.
Before lifting, put up temporary supports every 4–6 feet along the porch roof. The size and weight of your porch will guide you in this step. Use pressure-treated lumber for these supports. It’s good against moisture and rot, making it last longer.
Use hydraulic jacks to raise the roof little by little, about 1/8 inch at a time. This prevents harm to the structure. Keep checking the temporary supports for any issues. Use 2x4s to add cross bracing. This step keeps the supports stable and stops them from moving side to side.
It’s also critical to plan well, especially to follow building codes. Not following these rules can lead to fines or problems with permits and insurance. Leaving your roof without support for too long can cause big and expensive damages.
But there’s more to porch prep than just adding supports. Make sure you know where your private utilities are to avoid service interruptions. Not doing this can slow down or complicate the lifting.
In summary, the key steps for a roof lift include inspecting carefully, putting supports in place, and following the rules. By doing these things, you can revamp your porch both efficiently and safely.
Step-by-Step Instructions to Jack Up Your Porch Roof
Raising your porch roof can be a rewarding DIY project. We’ve broken the process into simple steps for safety. Follow this guide to ensure great results.
- Inspect Your Porch: Start by examining your porch. Look for rot, damage, or weaknesses. Knowing these issues helps you prepare for lifting.
- Gather Materials: Collect all necessary tools and materials. You need items like temporary jack posts, a bottle jack, and structural screws. If needed, get replacement lumber.
Tools Materials Cordless Impact Driver Two 2×4 Posts for Temporary Support Reciprocating Saw Structural Screws Circular Saw Rough-Sawn Cedar 6×6 - Stabilize the Porch: Use temporary supports (two 2×4 posts) every 6 feet along the porch. This prevents damage during the lift.
- Jack Up the Porch Roof: Use a bottle jack under the area to be lifted. Raise the roof slowly and avoid over-lifting to prevent stress on the structure.
Wooden spacers can be a budget-friendly choice, as discussed on Houzz. After lifting, check all joints and make necessary repairs. Alignment is key for a smooth finish and structural strength.
Ensure each supporting column is placed correctly, ideally every 6 feet. Good drainage is crucial, so the drip edge should overlap by 2 inches and extend ¾ inch beyond the fascia. Following these steps will keep your porch roof safe, functional, and looking good.
Post-Project Tips and Maintenance
After you lift a porch roof, it’s important to keep it in good shape. By checking regularly for damage like chipped paint, cracks, or rot, you can fix small problems early. The main focus should be on the porch posts since they support the porch and your house. If these posts sag, lean, or wobble, they need quick attention because it means the structure is weak.
To stop wood posts from rotting, you should apply insect-repellent treatments. This helps them last longer by keeping termites and other insects away. Metal posts, however, could get rusty and require a different care approach. To keep them in top condition, clean them regularly and apply fresh paint or stain every few years.
When fixing your porch, replace columns in pairs to keep it stable. Sometimes, you might need to dig deep footings for new posts, based on local ground freeze rules. Doing this helps prevent problems caused by water getting in. In fact, if you see water stains where the porch roof meets the house, it could mean there’s structural damage that needs fixing.
For serious structural problems, hiring a professional is a smart move. They make sure repairs meet building codes and your porch stays stable. After repairs, keeping up with cleaning, using insect repellent, and doing occasional repaints or stains will help a lot. These steps are key for a safe and lasting lifted porch roof.
| Maintenance Task | Wood Posts | Metal Posts |
|---|---|---|
| Inspection Frequency | Every 6 months | Annually |
| Cleaning | Remove debris and dirt | Wire brush and remove rust |
| Painting/Staining | Every 3-5 years | Every 5-7 years |
| Insect Repellent Application | Every 2-3 years | Not necessary |
When to Call a Professional for Help
Raising a porch roof can be tricky and sometimes needs more than DIY skills. It’s often smart to hire a roofing pro to ensure safety and the work lasts. Acculevel has helped over 35,000 homeowners since 1996. This shows how key it is to get expert help when needed.
Dealing with uneven settling in new homes can hint at serious foundation problems. This affects the house’s strength. A roofing contractor is crucial here. They might use helical piers for lighter structures like porches. Push piers might be too strong. Sometimes, piers don’t fully fix the problem. Slabjacking, which lifts the slab with foam, may be needed.
Huge gaps under the porch can cause cracks. This needs both stabilization and lifting. It’s important to keep the floor level. Also, don’t overlook roof flashing. It directs water away to stop leaks and damage. A pro can help pick the right materials, like special tapes or coatings, to prevent issues.
Working with expert roofers keeps your porch safe and follows rules from places like the NRCA. Complex jobs, like using roofing cement or putting in step flashing, need a pro. It saves time, effort, and money in the long run. Remember, professional help is a smart investment for your home.