Want to make your porch look better and last longer? Installing soffit underneath is a great idea. This guide will show you how to install soffit under your porch. It’s perfect for your next porch improvement project. Soffit not only makes your porch more beautiful but also guards it against the weather and unwanted animals.
No matter if you’re skilled or just starting out, this guide has something for you. You’ll learn what soffit is for, what materials and tools you’ll need, and how to put it all together. We even have advice on keeping air moving and how to take care of your soffit after it’s up. And, if you run into trouble, we’ve got tips to fix common problems. Are you ready to upgrade your porch with these easy porch soffit installation tips? Let’s start!
Key Takeaways
- Understanding soffit and its benefits for your porch
- Comprehensive list of tools and materials required
- Step-by-step guide to preparing and installing soffit panels
- Important ventilation considerations for optimal airflow
- Maintenance tips for ensuring long-lasting soffit performance
- Troubleshooting common installation issues
Understanding Soffit and Its Purpose
The soffit is key in covering the underside of an eave. It impacts the look and safety of your porch. Installing it right ensures the structure is solid and meets local codes. Its benefits include looks and safety, with safety being most important.
Soffit panels, like those made of vinyl and aluminum, guard against water and pests. They help keep your attic well-ventilated. This stops moisture and heat from building up, protecting your roof eaves.
Vented soffits keep your attic from getting too hot. This can help your shingles and roof parts last longer. If your attic overheats, you might pay up to 30% more for cooling. Also, too much moisture can cause mold and mildew, happening in half of the homes in some areas.
Soffit benefits go beyond just protection. They also improve how your porch looks. There are many materials to choose from for soffits, like wood, vinyl, aluminum, and more. Each has its own upkeep needs and costs. Wood looks great but needs a lot of care. Aluminum is easier to keep up and keeps bugs away, but it costs more.
Well-ventilated soffit panels stop mold from growing and save on energy costs. Soffit vents that go all the way around allow for lots of air flow. Even just a few vents can help, if they’re placed right. This keeps air moving well in your attic, saving money and keeping your home comfortable.
Correct soffit installation can also prevent ice dams by improving air movement in the attic. This avoids water damage. Whether you choose sturdy fiber cement or affordable PVC, soffits are crucial for lasting protection and adding beauty to your porch and home.
Soffits offer many benefits, like protection, saving energy, and making your porch look nicer. Choosing and installing them right is important for your home’s structure and look. They also protect your roof eaves and attic from damage.
Tools and Materials You’ll Need
Starting a DIY porch project means you need the right tools and materials. First, gather your soffit installation tools. You’ll need things like a circular saw, combination square, and tin snips. Don’t forget hammers and 1-inch aluminum trim nails for attaching soffit panels.
Then, think about the materials for soffit installation. You can choose between aluminum and vinyl soffit panels. Both are tough and come in 12-foot lengths. Aluminum fascia boards are usually 6 or 8 inches wide. Make sure you buy enough by measuring your fascia’s total length and adding 5% more for any waste. For attaching aluminum trim, use 1-1/2 inch nails. If your soffit is more than two feet wide, add a nailer in the middle for extra support.
Don’t forget about ventilation. You need one square foot of vents for every 300 square feet of ceiling. Install circular vents on any soffit board. Also, measure for the drip edge. Do this by taking the roof edge’s total length, dividing by 10, and adding 5% for waste.
If you’re working high up, consider using scaffolding for a week. Having someone help you with the materials can make the job go faster. Even though most soffit installation tools are under $50, buying quality ones makes for a better porch upgrade.
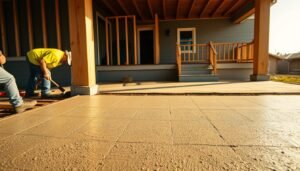
Preparing Your Porch for Soffit Installation
Getting your porch ready for soffit installation is key. It starts with taking off old trim and making sure the base is clean and level. Check the existing structure for damages. Fix any issues to ensure a solid base.
It’s vital to measure accurately for soffit panels. They come in different sizes. By measuring precisely, you’ll know how many panels you need. Always buy about 5% more materials to cover any measuring mistakes.
Remember to allow room for the soffit to expand and contract, especially if it’s aluminum. About ¼ inch of space at the end of each soffit is good. In cold areas, make this space a bit wider to stop buckling when temperatures drop.
Ready porches and careful measurements make installing soffit smoother. Here are key measurements for soffit installation:
| Item | Description | Recommendation |
|---|---|---|
| Expansion Room | Space left for expansion due to temperature changes | ¼ inch (or 1/16 inch in colder climates) |
| Extra Material | Additional material to account for errors | 5% extra |
| Soffit Panel Length | Standard lengths of panels | 12 feet |
| Soffit Panel Width | Recommended width for easy ordering | 16-inch ventilated panels |
Installing the Soffit Panels
Installing soffit panels well means paying close attention to detail. A systematic approach is key.
The first step is to put the soffit starters or wall receivers in place. These are the base for your soffit panels. Measure the area carefully to figure out how many soffit panels you need. This is based on the space between the fascia end and the wall.
Then, cut the panels to fit the dimensions you measured. Making sure your cuts are exact is critical. This prevents any gaps or misalignments, which can mess up the look and function of the soffit. Put the first panel in the starter channel, making sure it’s straight. The panels should connect easily and can be nailed down on one side. This makes the installation process easier.
Here’s a quick overview that highlights why proper installation is crucial:
| Aspect | Consideration | Benefit |
|---|---|---|
| Airflow Enhancement | Soffit installation enhances airflow between the home and attic, reducing mold and moisture buildup. | Improved indoor air quality |
| Weather Protection | Protects from extreme temperatures, rain, and snow. | Prevents water damage |
| Material Options | Vinyl, aluminum, and wood available. | Different aesthetic and functional needs |
| Support | Furring strips placed every 16 inches for proper support. | Ensures structural integrity |
| Maintenance | Vinyl soffit ceilings require minimal upkeep. | Cost-effective in the long term |
| DIY Feasibility | 70% of homeowners can complete the installation without professional help. | Feasible weekend project |
Keep attaching each soffit panel, staggering the seams by one or two gaps. This avoids alignment with every truss. Nail each panel at 16-inch intervals into the furring strips. Following this method ensures your soffit panels are secure. This gives your porch ceiling strong protection and improves its look.
By using this step-by-step guideline for installing soffit panels, you can make your home look better. Plus, it adds to your home’s value. It also offers benefits like better airflow and weather protection.
Ventilation Considerations
Having the right airflow in your porch is key to keeping it healthy and lasting a long time. The soffit ventilation importance is huge because it helps with attic ventilation. This stops moisture damage. The IRC’s 2018 edition says you need one square foot of Net Free Ventilating Area (NFVA) for every 150 square feet of attic. But, if you’re in climate zones 6, 7, or 8 and have a Class 1 or Class 2 vapor retarder, it’s one square foot per 300 square feet.
Following the recommended attic ventilation ratio stops mold and mildew. These can cause health issues. Important to remember: 40% to 50% of vents should be near the top of your roof. This helps air move well, stopping moisture damage and saving the structure.
When improving airflow, look at different soffit vents. Lanced, round, or hidden vent styles are options. Lanced vents have slats for balanced airflow and less dust. Round vents use circular holes. Hidden vents look good but might be hard to clean and less effective. No matter the type, cleaning them yearly is a must for the best airflow.
The rule is 1 square foot of vent for every 150 square feet of attic. For a 50’ x 30’ attic, that means 10 square feet of vent area. Half of that should be soffit vents. Using 6” x 12” soffit vents, you’d need 10 for this attic size. Make sure to follow local rules and get expert advice.
Combine soffit vents with exhaust vents like ridge vents for a better attic ventilation system. This setup helps air move right, cutting down risks of heat and moisture. Those problems can seriously damage your home if ignored.
Materials also play a big role. Wood soffits can hold moisture and bring in termites. But, aluminum, vinyl, or composite ones last longer and fight damage better. This choice boosts soffit ventilation importance and helps your home’s structure last longer.
In complex roofs, getting a pro to install vents might be best, especially in wet climates. Plus, regular checks and cleanings stop moisture damage. They make sure your ventilation works well for a long time.
Finishing Touches and Maintenance
After you finish the finishing soffit installation, make sure to protect and improve your work. Use sealants and trims that match your home’s look. This will not only make it look better but help it last longer. To keep everything in place, use 1-1/2-inch trim nails for the soffit panels and fascia.
It’s important to keep your soffit panels well-ventilated to stop moisture from building up. Moisture can cause damage. Regularly check and clean your soffit panels and fascia to avoid decay. This will help your porch soffit last longer. Make sure to clear up debris, control pests, and fix any issues on time.
To keep pests away, use natural repellents like peppermint and eucalyptus oils. Fixing ice dams by making your attic better insulated and ventilated can stop water leaks and damage. Following these easy steps will keep your porch soffit in top shape for many years.
If you live where wildfires are common, choose non-flammable materials like metal for your eaves and soffits. This meets Chapter 7A of the California Building Code and lowers fire risks. Keeping eaves well-maintained is key. Check for leaks and make sure they’re ventilated well. This keeps your home safe and in good condition.
Troubleshooting Common Issues
When you work on soffit installation, you might face several issues. The main ones include bad alignment, not enough ventilation, and using wrong materials. If your soffit panels don’t line up right, it may be because of uneven cuts or wrong measurements. Take time to measure again and cut the panels correctly for a perfect fit. Proper alignment makes everything look good and keeps the structure safe.
Ventilation is key in putting up soffits. The “1 in 300” rule means you need 1 square foot of venting for every 300 square feet of attic area. For a 900 square foot attic, you need 3 square feet of ventilation. This balance helps your HVAC system work less hard, lowering your energy costs by 10-20%. To fix ventilation issues, add more vents, especially in big attics or cold places where ice dams can form.
Using different soffit materials can cause problems. Make sure all your materials match well to stop them from getting damaged too soon. Bad installation can make soffits sag, leading to moisture issues. Regular checks and cleanings help avoid these issues. If you need help with soffit or attic fan problems, check out Attic Breeze for troubleshooting steps.