Turning your home’s outside look into something special is rewarding. Especially if you’re building a small porch with steps. It’s not just about making it look good. It also gives your family extra space to use. This DIY guide helps you from start to finish. It covers following local rules to building the porch right. With this, you’ll have everything to make a beautiful, strong porch.
Starting with a good plan for your porch is key. It makes sure your steps are not only nice but safe too. Begin by measuring how tall and deep each step should be to get it right. Remember, sticking to local building rules is a must. Ignoring this could cost a lot and be unsafe.
For step-by-step instructions on making DIY porch steps, look at this detailed guide. It shows how to build steps and make sure they meet all requirements. Check out how to build deck stairs for more.
Key Takeaways
- Measure riser and run heights accurately to ensure safety and compliance.
- Follow local building codes to avoid costly mistakes and ensure durability.
- Use quality materials like Douglas Fir for long-lasting construction.
- Consider design elements such as a Victorian farmhouse porch for aesthetic appeal.
- Simple DIY porch steps can be completed under $900, a fraction of professional costs.
- Proper spacing and measurements of stringers and treads guarantee a sturdy build.
- Finish with paint or stain for protection against weather and insects.
Planning Your Small Porch Design
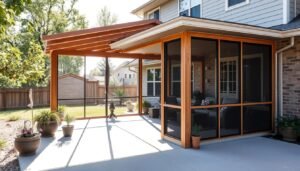
When you start planning your porch, think about both how it looks and how it works. Great design ideas for small porches can make your home look more inviting. A smart porch design uses limited space well for hanging out and enjoying time with friends and family.
Adding DIY projects to your porch design can save you money and add a personal touch. Building a new porch can cost between $15,000 and $30,000. But remodeling one can be cheaper, from $5,000 to $15,000, and you could get 70% of that cost back later.
Did you know homes with porches are thought to be worth 20% more by buyers? Improving your porch’s look could give you an 80% return on what you spend. This is huge for those wanting to sell their home for more.
A porch can also give you up to 30% more outdoor space. About 60% of homeowners like porches with roofs for extra comfort. And screened porches are becoming more popular, up by 25%, because they let you enjoy the outdoors without bugs.
For a porch that’s easy to take care of and good for the planet, think about using TimberTech Porch boards and AZEK Exteriors Trim and Moulding. They’re made from recycled materials and can cut down on upkeep costs by about 50%.
Gathering Necessary Tools and Supplies
Before starting on porch steps, make sure you have the right DIY tools and materials. This will save time and make the building process smoother. You’ll need everything from power tools to special fasteners. Let’s look at what you need for the job.
To do well in your outdoor projects, especially porch steps, high-quality tools and materials are key. Here’s what you need to gather:
- Power Drill and Bits: A good power drill and various bits for wood and masonry are essential.
- Circular Saw: It helps make precise cuts in wood and composite materials.
- Measuring Tape and Carpenter’s Square: For accurate measurements and markings, these tools are necessary.
- Level: It’s important to keep your steps even and balanced for both safety and looks.
- Miter Saw: Perfect for cutting angles in the stair stringers and wood pieces.
- Clamps: They hold pieces in place during fastening or drying.
- Hammer and Nails: Basic but vital for any woodworking project.
- Screws and Anchors: Special screws are needed for the risers and masonry screws for the staircase bottom.
Don’t forget, building porch steps also means getting materials like stringers, treads, risers, and railing parts. Choose quality wood or composite materials that last and stand up to the weather.
| Tool/Material | Description | Estimated Cost |
|---|---|---|
| Power Drill and Bits | Needed for drilling holes and driving screws. | $50 – $150 |
| Circular Saw | Cuts wood and other materials. | $100 – $300 |
| Measuring Tape | Important for accurate measurements. | $10 – $30 |
| Miter Saw | Great for angled cuts. | $150 – $400 |
| Clamps | Keeps pieces securely together. | $20 – $50 |
Having the right supplies for outdoor projects improves your work efficiency. It also helps your porch steps last longer and stay safe. Always prepare well for any DIY project!
Building the Porch Frame
Creating the frame for your porch is a key step in your do-it-yourself porch project. You must pay close attention to make sure your porch is strong, safe, and looks good. Here is a step-by-step guide to help you excel in building a porch frame for your home improvement work.
Before starting your porch project, collect all the tools and materials you need. Being prepared helps your project go smoothly and avoids delays. Once ready, you can start building your porch frame by following these steps:
Begin by digging the footing holes to the right depth. This depth changes based on your location and local building rules. In places with cold weather, you might need to dig about four feet deep to avoid frost issues. Use about 3 inches of loose gravel at each hole’s bottom to add stability.
Then, set up the porch’s frame by placing the floor joists 16 inches apart. Remember to add a slight slope for water to drain off. This slope should be about a ¼-inch drop for every 5 feet of your porch. This prevents water from gathering and causing damage.
The following table outlines these important steps and tips:
| Step | Description | Measurement |
|---|---|---|
| Footing Depth | Required depth due to frost heaving | 4 feet (colder regions) |
| Gravel Layer | Stability at bottom of footing holes | 3 inches |
| Floor Joists | Spacing between joists | 16 inches apart |
| Water Drainage Slope | Slope for water runoff | ¼-inch drop per 5 feet |
Make sure the floor joists can carry the right amount of weight. Porches often need to hold up to 80 lbs per square foot, more than decks. Also, use protective metal flashing to keep water from getting into important spots. This helps your porch last longer.
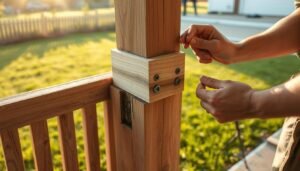
To keep the joists tightly together, use lag screws with nuts and washers. This makes your porch stable and able to handle different weights and weather. Always check your local building rules. Some places, like historic areas, might have specific rules about building materials.
For detailed instructions on building a porch, visit Wilker Dos’ guide on building a front porch. This guide gives you helpful tips and clear steps to finish your porch project.
By following these tips and focusing on important details, you’ll build a functional and attractive porch frame.
Adding Steps to Your Porch
Adding steps to your porch does more than just make it look nice. It also makes your porch more functional and welcoming. For a standard DIY step project, you usually need 2” x 10” or 2” x 12” wood for the steps. Each step will be about 4.25 inches high, making it easy and safe to use.
The steps’ frame is made with 2” x 4” treated wood that’s okay for touching the ground. When making the bottom step, the wood is cut to 3.25 inches to fit the step’s top part. Short bits of wood, 14 inches apart, hold everything up well.
This project uses a box method, which might use more wood but makes it stronger. As you add more steps, though, it might cost more. With three steps, it’s important to make sure everything is firmly in place. We use concrete and 4” x 4” post anchors for this.
We also add extra support using leftover 2” x 4” and 2” x 6” wood. A project like this often takes more than one weekend, depending on how quickly you work.
Choosing to add the steps yourself is smart and saves money. Half of the people fixing their porches go the DIY route. Doing a good job could make your house look better and even raise its value. For example, a house with nice porches might sell for 15% more than others.
When you’re working on your porch steps, it’s important to get every detail right. Small things, like a new coat of paint, can make a big difference. It could make your house seem worth 10% more. So, take your time to plan and do every step of adding porch steps carefully.
Final Touches and Maintenance Tips
After building your porch and steps, focus on the final touches and keep them up. Start by cleaning everything well. Sweep often and wash with gentle soap and water to keep it looking good and avoid dirt.
Use a water-repellent sealer on wood every few years to make it last longer. This protects it from moisture and damage. Check corners and joints often for rot, and fix them to keep the porch strong.
Choosing the right fasteners is key to a good porch. Use stainless steel or hot-dipped galvanized ones to avoid rust. A new coat of paint on your decking can also make it last up to 100 years.
Gutters and downspouts keep water away, helping to protect your porch from moisture. Weather stripping around doors adds extra protection. Updating your railings and columns not only looks good but keeps you safe.
Switching to LED bulbs in your lights looks great and saves energy. By doing these things, your porch won’t just look nice; it’ll last for a long time.