
You’ll find that pergola construction requires more than aesthetic vision—it demands structural integrity, proper material selection, and site-specific engineering. Whether you’re considering pressure-treated lumber for a classic design or powder-coated aluminum for contemporary minimalism, each pergola style presents distinct load-bearing requirements and foundation specifications. The distinction between a backyard feature and a functional outdoor room lies in understanding how architectural elements like integrated seating, climbing plant support systems, and hardscape coordination work together.
Classic Wooden Frame Design
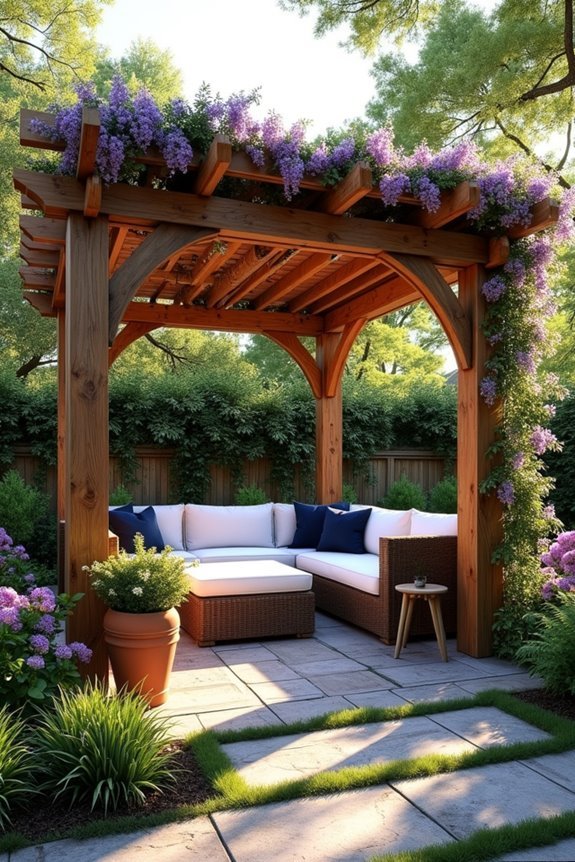
The classic wooden frame pergola represents the foundational construction method that’s dominated residential landscape architecture for decades. You’ll construct this structure using pressure-treated lumber or naturally rot-resistant species like cedar and redwood. The assembly involves positioning four vertical posts in concrete footings, typically spaced 8-12 feet apart, then securing horizontal beams with galvanized hardware. Cross-rafters sit perpendicular to main beams, creating the characteristic overhead lattice pattern. This design’s timeless charm stems from its straightforward geometry and structural integrity. You’re working with standardized dimensional lumber—4x4s for posts, 2x6s or 2x8s for beams—ensuring compatibility with your existing garden layout. The natural aesthetics complement various architectural styles while providing approximately 50-60% shade coverage through strategic rafter spacing.
[affiai keyword=”classic wooden frame pergolas” template=”carousel” count=”3″]
Modern Metal Minimalist Structure
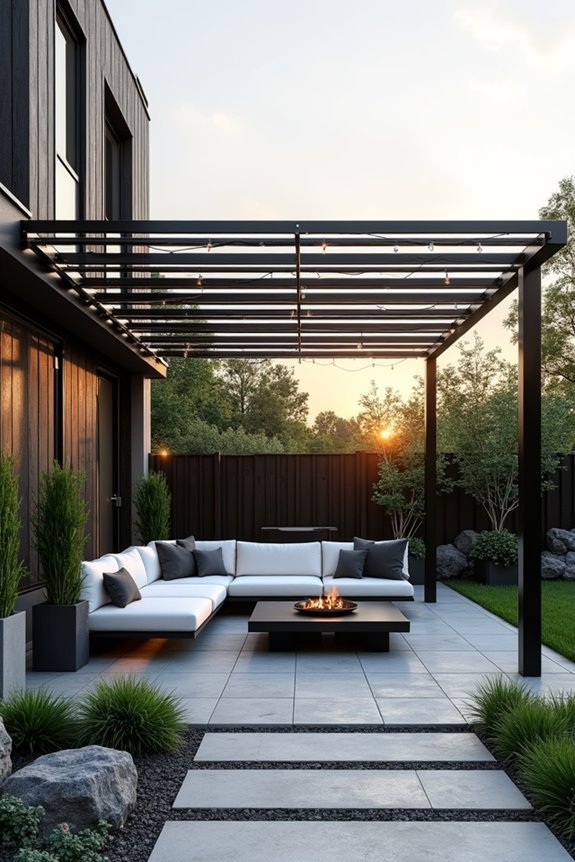
Contemporary metal pergolas leverage engineered aluminum or powder-coated steel components to achieve clean architectural lines with minimal structural mass. You’ll find these structures particularly effective in modern landscape designs where simplalist aesthetics demand precision-welded joints and standardized beam profiles. Unlike rustic metal finishes that emphasize patina and weathering, powder-coated options maintain consistent color integrity across exposure zones.
Your construction approach should prioritize modular assembly, utilizing pre-fabricated connection hardware rated for regional wind loads. Consider galvanized steel posts set in concrete footings with appropriate frost-depth calculations. The minimalist framework reduces visual obstruction while providing essential shade geometry—typically employing 4-inch square tubing for posts and 2-by-4-inch rectangular sections for rafters. Install post-to-beam connections using through-bolted flanges rather than welded assemblies for field adjustability during installation.
[affiai keyword=”contemporary metal pergolas” template=”carousel” count=”3″]
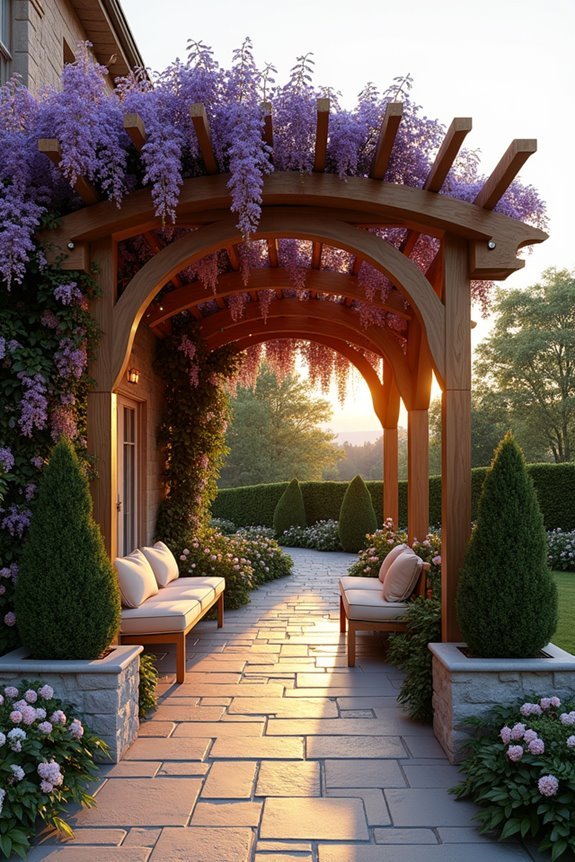
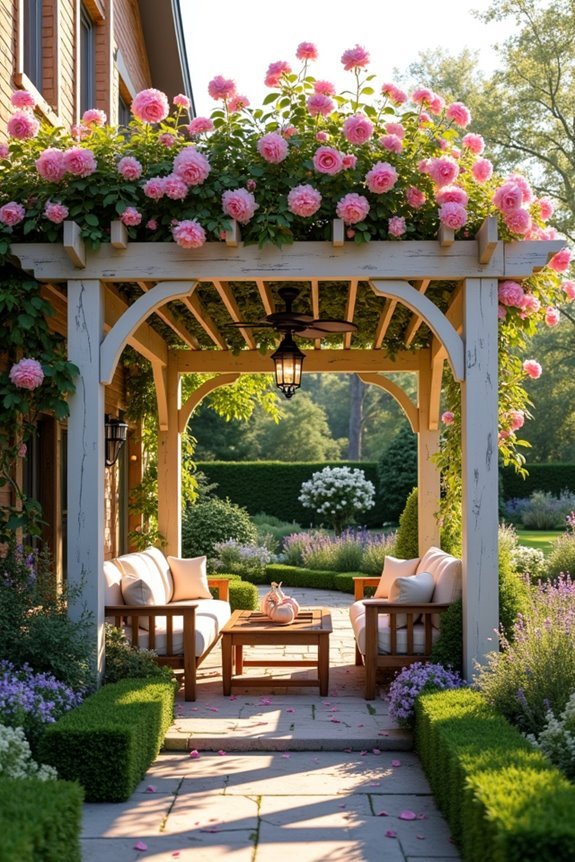
Rustic Vine-Covered Pergola Style
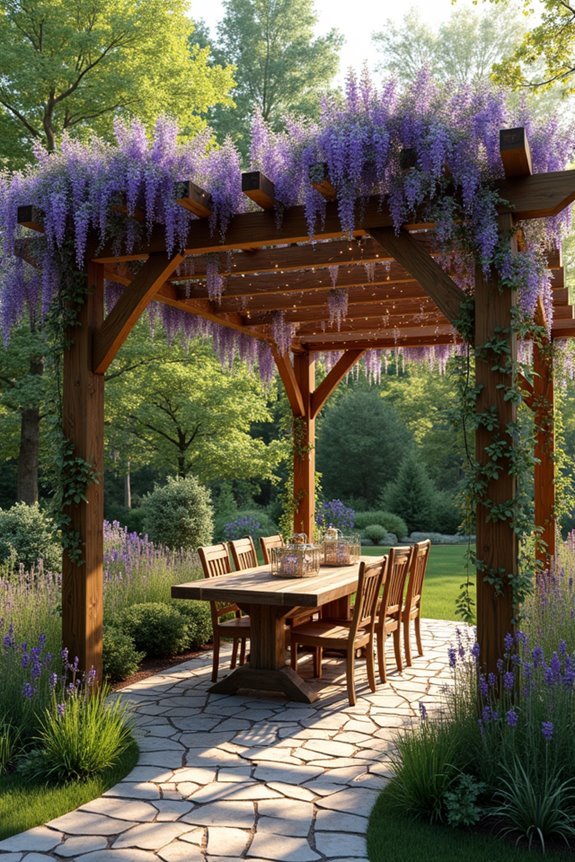
While modern materials dominate commercial installations, rustic vine-covered pergolas require specific structural considerations to accommodate dynamic biological loads and moisture exposure. You’ll need pressure-treated lumber or naturally rot-resistant species like cedar to withstand constant moisture from climbing vegetation. Calculate dead loads at 15-20 pounds per square foot to account for mature vine mass, especially for wisteria or trumpet vine installations.
Rustic elements demand reinforced post-to-beam connections using galvanized hardware, as organic growth creates lateral stress points. You’ll want 6×6 posts minimum, spaced 8-10 feet maximum for adequate vine support. Install horizontal cross-members at 12-16 inch intervals to facilitate vine aesthetics and proper climbing patterns. Apply penetrating wood sealers annually to exposed surfaces, maintaining structural integrity while preserving the weathered appearance characteristic of authentic rustic construction.
[affiai keyword=”rustic vine covered pergola” template=”carousel” count=”3″]
Attached Patio Cover Version
Attached patio cover pergolas require ledger board integration directly into your home’s structural framework, demanding compliance with local building codes for lateral load transfer and flashing protocols. You’ll need to install through-wall flashing above the ledger to prevent moisture infiltration. Your pergola design must account for roof pitch changes and adequate clearance from existing soffit vents.
When exploring attached patio ideas, consider post placement that doesn’t compromise underground utilities or irrigation systems. You’ll want to verify your foundation’s load-bearing capacity before anchoring support columns. Install joist hangers rated for outdoor exposure, maintaining proper spacing per your beam span calculations. Don’t forget to coordinate your rafter tail profiles with existing architectural elements. This integration creates seamless indoor-outdoor flow while providing structural shade coverage.
[affiai keyword=”attached patio cover pergola” template=”carousel” count=”3″]
Freestanding Garden Centerpiece Design
Freestanding pergolas function as standalone architectural elements that don’t require host structure integration, offering placement flexibility throughout your landscape. You’ll position these freestanding structures strategically within garden beds, lawn areas, or pathways to establish focal points that enhance garden aesthetics.
Construction demands four corner posts anchored through concrete footings or ground screws, typically spaced 8-12 feet apart for standard dimensions. You’ll need 6×6 posts for structural integrity, topped with 2×8 beams and 2×4 rafters configured in your preferred spacing pattern.
Install cross-bracing between posts to resist lateral forces from wind loads. You can incorporate climbing plant supports, integrate lighting conduits, or add decorative end cuts to rafters. Consider sight lines from multiple viewing angles when determining placement for maximum visual impact throughout your garden.
[affiai keyword=”freestanding garden pergola” template=”carousel” count=”3″]
Pergola With Retractable Canopy
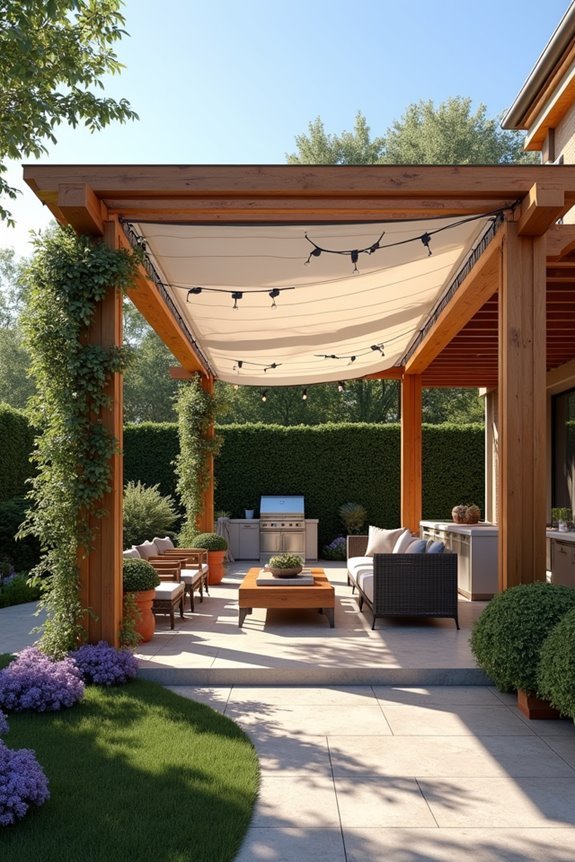
Retractable canopy systems transform standard pergolas into climate-responsive outdoor rooms through motorized or manual fabric deployment mechanisms. You’ll select from three primary canopy materials: acrylic-coated polyester for UV resistance, PVC-backed fabrics for waterproofing, or solution-dyed acrylics for colorfastness. Track-mounted systems require precise header beam alignment—verify your structure supports 15-20 pounds per linear foot before installation.
Critical installation tips include mounting hardware into load-bearing members, maintaining 10-12 degree slope angles for water runoff, and installing drainage channels at collection points. You’ll position the retraction mechanism on your structure’s leeward side to minimize wind resistance. Pre-drill all mounting holes, use stainless steel fasteners in exposed applications, and tension fabric uniformly across guide wires. Consider motorized systems with wind sensors for automated storm protection.
[affiai keyword=”retractable pergola canopy” template=”carousel” count=”3″]
Corner Space-Saving Pergola
Corner Space-Saving Pergola
Corner pergolas maximize underutilized yard zones by anchoring structural loads into two existing boundary walls or fence lines, reducing material costs by 40-50% compared to freestanding configurations. You’ll need only two load-bearing posts instead of four, with lateral bracing provided by your existing structures. Position rafters at 16-inch centers for ideal shade distribution while maintaining structural integrity. This design excels in space utilization for compact yards, transforming dead corners into functional outdoor rooms. Install ledger boards with lag bolts directly into wall studs, ensuring proper flashing to prevent water infiltration. Integrate corner plants like climbing jasmine or clematis along the perimeter posts to soften architectural lines. The L-shaped footprint creates natural traffic flow patterns while preserving central yard space for alternative uses.
[affiai keyword=”corner pergolas for small yards” template=”carousel” count=”3″]
Pergola With Built-In Lighting
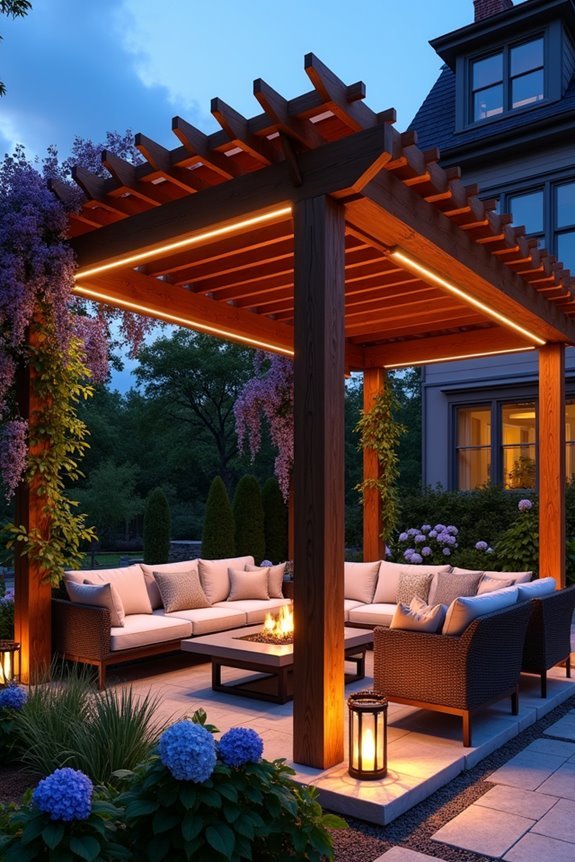
Integrated lighting systems transform pergolas into 24-hour functional spaces while adding 15-20% to initial construction costs but eliminating future retrofit expenses. You’ll need to plan electrical conduit pathways during the framing stage, routing wiring through hollow beams or creating dedicated chases. Low-voltage LED strips mounted along rafters provide superior ambient lighting while maximizing energy efficiency—consuming 75% less power than traditional incandescent fixtures.
Install dimmer controls to adjust illumination levels for different activities, from bright task lighting for outdoor dining to subtle accent lighting for evening relaxation. You can integrate solar-powered options in areas where grid connection isn’t feasible, though battery storage requirements increase material costs by approximately 30%. Weatherproof junction boxes rated IP65 or higher guarantee reliable performance in outdoor conditions. Position downlights strategically to minimize glare while maximizing coverage.
[affiai keyword=”pergola with built-in lighting” template=”carousel” count=”3″]
Curved Archway Pergola Design
Graceful arches introduce architectural sophistication to pergola structures while requiring advanced carpery skills and specialized materials that increase project costs by 40-60% compared to standard rectangular designs. You’ll achieve curved structure benefits through enhanced visual flow and improved load distribution across the framework. Design material options include laminated veneer lumber (LVL) for consistent radius curves, steam-bent hardwoods for tighter arcs, or segmented construction using kerf-cut joints. Metal conduit or PVC forms serve as temporary bending jigs during assembly. Calculate arch rise using the formula: rise = (span²)/(8×radius) to maintain structural integrity. Pre-fabricated arched brackets eliminate complex joinery but limit customization. Install cross-members perpendicular to arch trajectory, spacing them 16-24 inches for adequate shade coverage and lateral stability.
[affiai keyword=”curved pergola designs” template=”carousel” count=”3″]
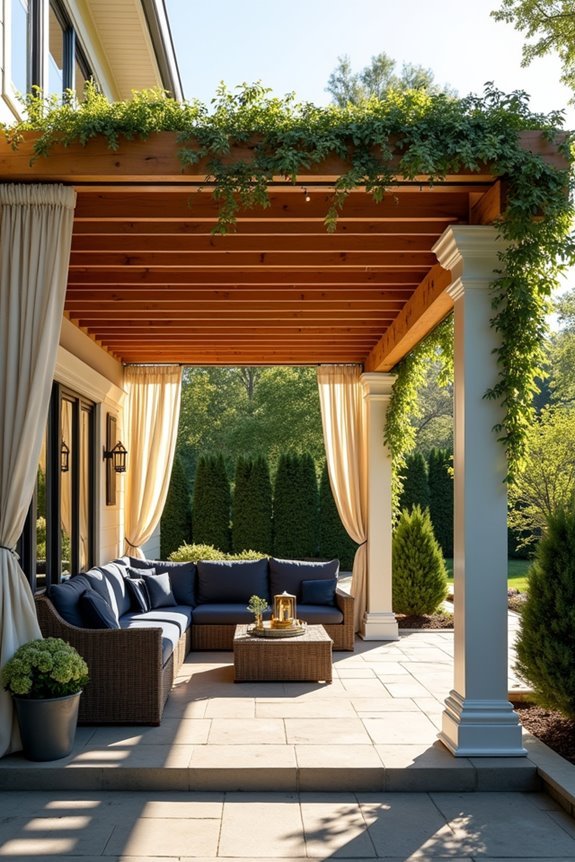
Pergola With Integrated Seating
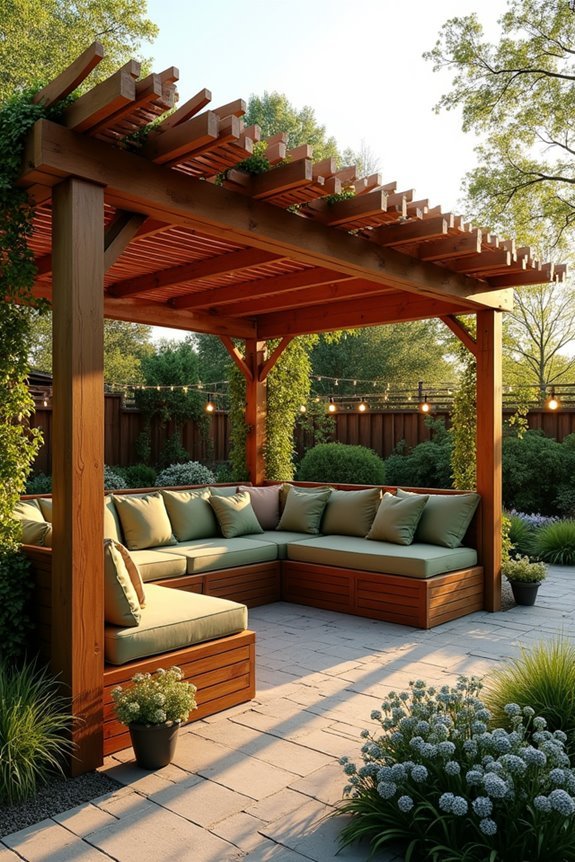
Built-in benches transform your pergola from a simple shade structure into a dedicated outdoor room that maximizes usable square footage while eliminating the need for separate furniture purchases. You’ll achieve peak functionality by installing integrated benches along the perimeter posts, utilizing structural framing members as bench supports. Construct seating platforms at standard 18-inch heights using pressure-treated lumber or composite decking materials that withstand weather exposure. Position your shaded seating to capture prevailing breezes while blocking harsh afternoon sun angles. Consider incorporating storage compartments beneath bench seats for cushions and outdoor accessories. Install backing boards at 15-degree angles to enhance ergonomic comfort during extended use. This configuration creates defined circulation paths while establishing intimate conversation zones that encourage social interaction within your pergola’s footprint.
[affiai keyword=”outdoor pergolas with integrated seating” template=”carousel” count=”3″]
Pergola With Privacy Screens
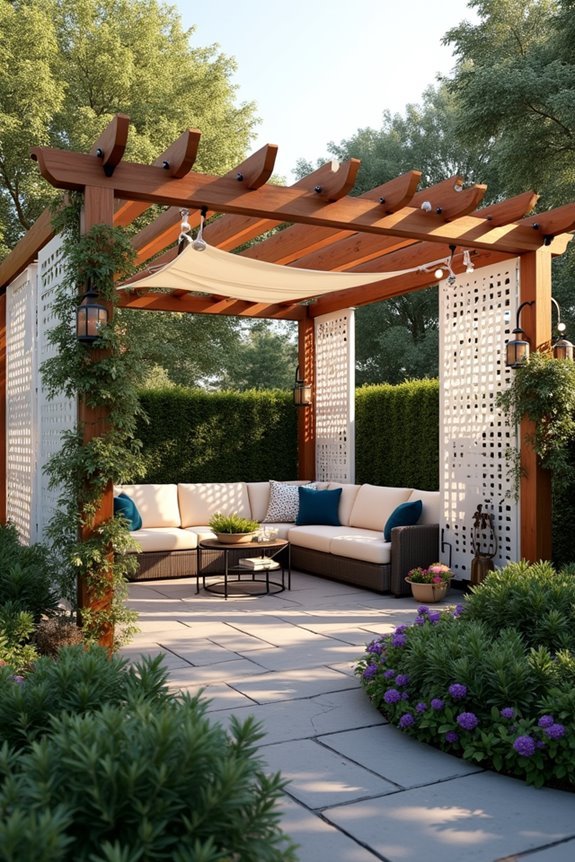
Privacy screens elevate your pergola’s functionality by establishing visual barriers that shield outdoor spaces from neighboring sightlines while maintaining airflow and natural light penetration. You’ll need to select pergola materials that accommodate screen integration—install vertical lattice panels between posts, mount retractable fabric systems on aluminum tracks, or construct louvered slat walls with adjustable angles. For organic solutions, incorporate privacy plants like climbing jasmine, Boston ivy, or clematis trained along wire cables suspended from crossbeams. Consider hybrid approaches: pair removable bamboo panels with quick-growing wisteria for year-round coverage. Screen placement requires strategic assessment of sun patterns and prevailing winds. Position screens on western or southern exposures to block afternoon glare while preserving eastern morning light access and cross-ventilation corridors.
[affiai keyword=”pergola privacy screens” template=”carousel” count=”3″]
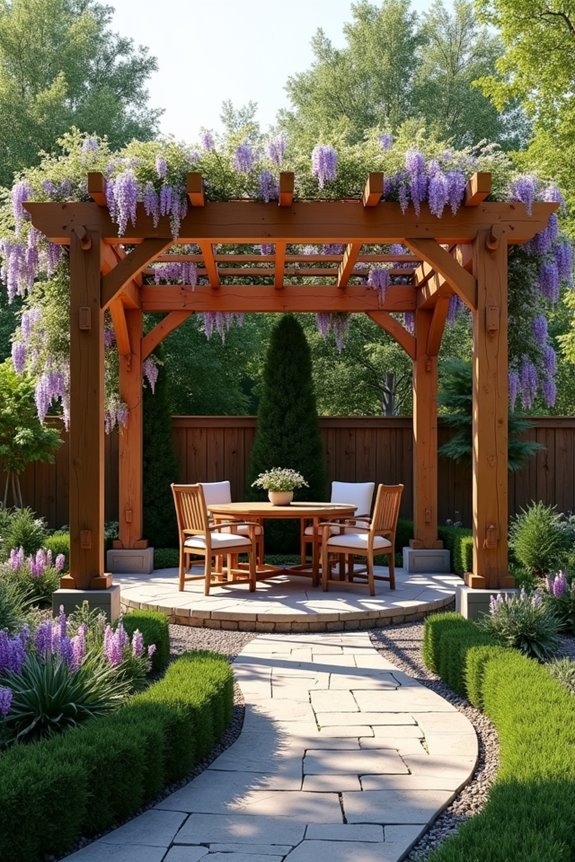
Pergola With Climbing Roses
Climbing roses transform pergola structures into fragrant architectural features that require proper support systems and cultivar selection for successful integration. You’ll need to install horizontal training wires or lattice panels at 18-inch intervals to accommodate cane growth patterns. Select disease-resistant climbing rose varieties like ‘New Dawn,’ ‘Zéphirine Drouhin,’ or ‘William Baffin’ based on your hardiness zone and sun exposure. Install plants 12-18 inches from pergola posts to prevent root competition and structural interference. Maintenance tips include spring pruning to remove dead wood, securing canes with flexible ties, and applying balanced fertilizer monthly during growing season. You’ll achieve ideal bloom coverage by training lateral canes horizontally along support structures. Monitor for black spot and powdery mildew, treating preventatively with appropriate fungicides.
[affiai keyword=”climbing roses for pergolas” template=”carousel” count=”3″]
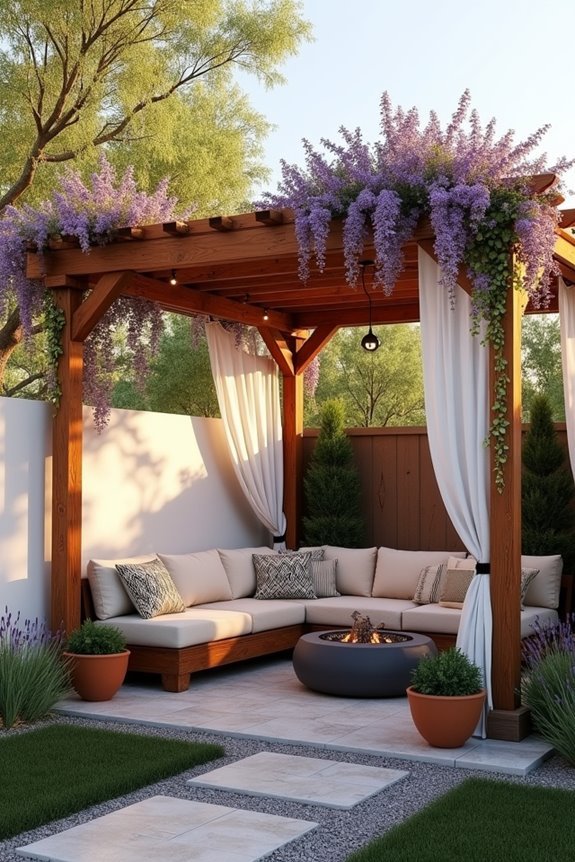
Pergola With Fire Pit Feature
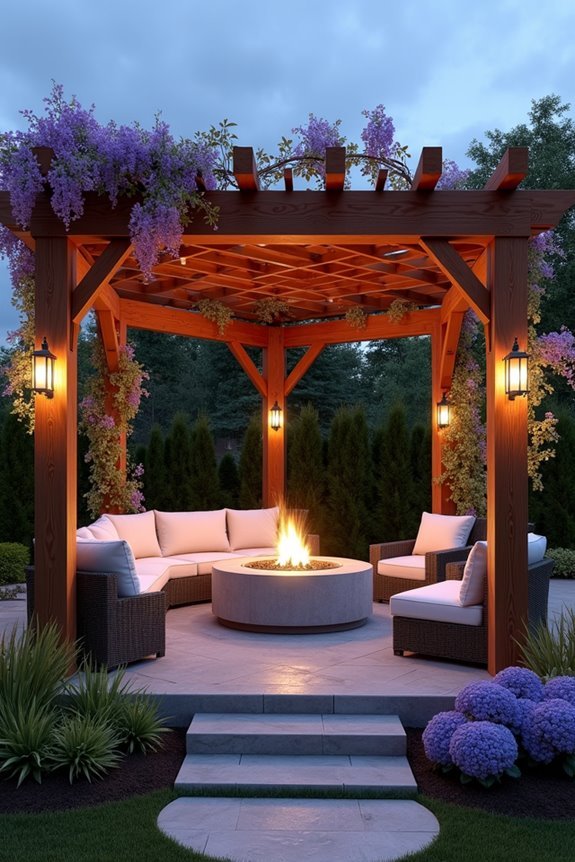
When you integrate a fire pit beneath your pergola, you’ll need to maintain minimum clearance specifications of 8-10 feet between the flame source and overhead beams to comply with fire safety codes and prevent heat damage to structural components. Install non-combustible materials like concrete pavers or stone within a 3-foot radius around the fire feature. Consider incorporating retractable canopy panels on your pergola to control smoke ventilation and protect against ember drift. Fire pit safety requires strategically positioning seating at appropriate distances while maintaining accessibility for emergency egress. You’ll enhance outdoor ambiance by installing dimmable LED strips along pergola posts, creating layered lighting that complements firelight. Select heat-resistant wood treatments or opt for metal pergola construction in high-temperature zones surrounding your fire feature.
[affiai keyword=”pergola fire pit design” template=”carousel” count=”3″]
Pergola With Water Feature
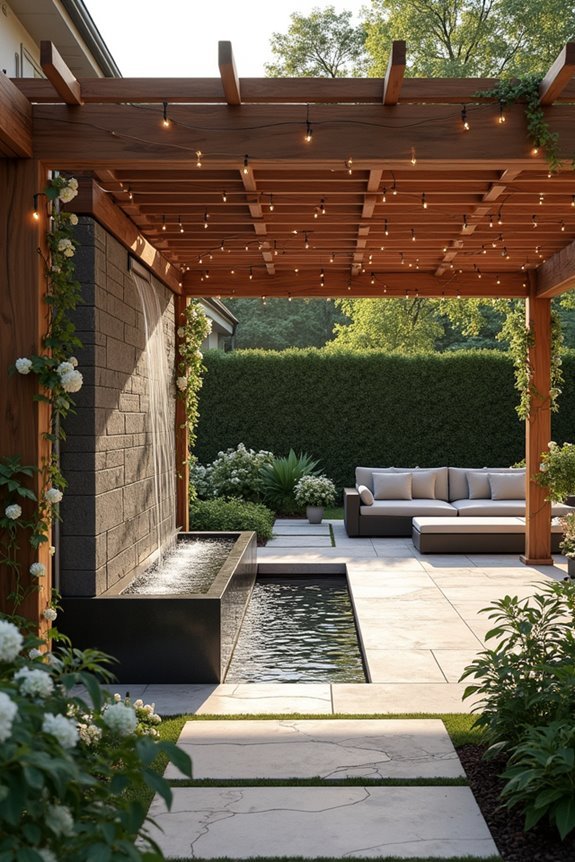
While fire features create dramatic focal points through heat and light, water elements bring cooling acoustics and reflective qualities to your pergola environment. You’ll find that integrating fountains, pondless waterfalls, or wall-mounted water features beneath your pergola structure creates a tranquil oasis that masks urban noise pollution effectively.
Position water features strategically to maximize the water sound’s acoustic benefits throughout your seating area. Install recirculating pump systems with adjustable flow controls to customize sound intensity levels. You’ll need proper drainage infrastructure and GFCI-protected electrical outlets within code-compliant distances.
Consider incorporating basin lighting to highlight water movement during evening hours. Make certain your pergola’s structural supports maintain minimum clearances from water features to prevent moisture-related deterioration. Apply marine-grade sealants to adjacent wooden components for enhanced moisture resistance.
[affiai keyword=”pergola water features” template=”carousel” count=”3″]
Multi-Level Tiered Pergola Design

Multi-level tiered pergola designs expand your outdoor living space vertically, creating distinct functional zones while maximizing limited footprint dimensions. You’ll construct an elevated platform for the primary structure, then integrate secondary tiered levels at strategic intervals to accommodate seating, dining, and lounging areas. This architectural approach requires precise grade assessment and structural calculations for load-bearing capacity across multiple planes. Install reinforced posts at each tier change point, ensuring proper beam span ratings and connection hardware specifications. You’ll need to account for drainage pathways between levels and incorporate steps with code-compliant rise-to-run ratios. The tiered configuration optimizes sight lines while providing natural privacy screening. Consider installing integrated lighting at tier changes for safe navigation and enhanced aesthetic impact during evening use.
[affiai keyword=”multi-level tiered pergola designs” template=”carousel” count=”3″]