Are you searching for a fun and budget-friendly home decor activity? Making a coffee filter wreath is simple and open to customization. It’s perfect for anyone, from craft pros to beginners. This DIY coffee filter wreath guide will help you make a charming addition to your home.
It’s affordable to create a wreath out of coffee filters. Plus, it’s a great way to show off your creativity. With some basic supplies and a bit of time, you can make a homemade wreath. It will look like it’s from a high-end store. Now, let’s start this fun crafting journey and turn coffee filters into a lovely wreath.
Key Takeaways
- You will need approximately 550 to 600 coffee filters for a full wreath.
- The total cost for coffee filters is around $4 if purchased from stores like Dollar Tree.
- The entire project takes about 8 hours to complete, with 30 minutes for preparation.
- For a 16-inch wreath form, two packages of coffee filters are recommended for a fuller appearance.
- You can create a beautiful wreath for less than $15, making it an affordable decor option.
Gather Your Supplies for the Wreath
Before starting your coffee filter wreath, make sure to collect all the needed wreath-making materials. This project is both fun and easy on your wallet, costing under $10. Check out the list of DIY wreath essentials to begin:
- Foam wreath base (approximately 9.8 inches in diameter)
- White basket-style coffee filters (around 150-200 regular size)
- Hot glue gun with glue sticks (10-15 sticks recommended)
- Dressmaker pins
- Instant coffee for dyeing the coffee filters, if you desire a vintage look
- A 10-inch length of red ribbon for hanging the wreath
- 5-6 lengths of red and white ribbon scraps for trimming
- Fishing wire for added stability when hanging
These coffee filter wreath supplies can be found at local craft stores like Michaels, or dollar stores. Using coupons and catching sales will help save money on your coffee filter wreath supplies, making it very affordable.
Also, grab scissors for any needed trims, and think about finger protectors when using the glue gun. If there are kids around, like preschoolers or kindergarteners, keep a close eye on them to ensure safe crafting.
With wreath-making materials ready, you’re set to craft a beautiful DIY coffee filter wreath. It will add a lovely and personal touch to your space.
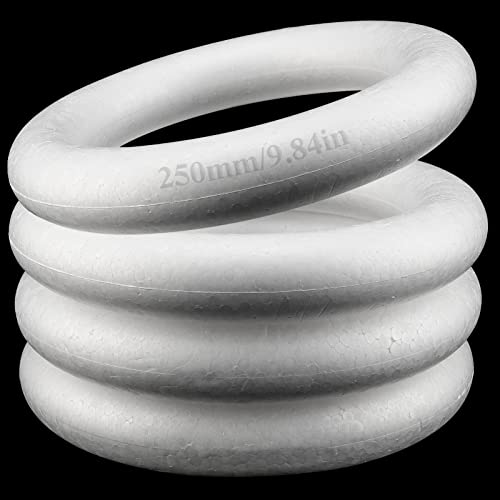
LIGHTWEIGHT BUT STRONG - Made of high-quality lightweight plastic, no shedding, not easily broken. Our wreath ring is light and smooth, while is also sturdy enough to be painted, pinned or sanded to create beautiful floral structures for various projects.
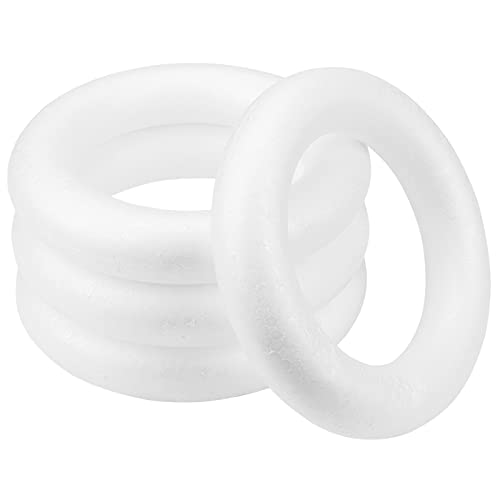
DURABLE MATERIAL - Our foam ring is made of durable polystyrene foam, which is lightweight, buoyant, firm, and smooth enough to provide the ideal surface for painting, cutting, staining, and glue. The white color foam wreath, perfect for you to create arbitrarily.

Proudly manufactured in the USA by Transylvania Wholesale Designs
Preparing the Coffee Filters
To begin making your DIY wreath, start with the coffee filters. First, gently unfold each filter. Make sure it stays round. If you’re adding color, mix 1 part paint with 10 parts water. Dip 15-20 filters at once for even coloring. This helps avoid them getting too crowded.
After dyeing them, lay the filters on a baking sheet. Heat your oven to 245 degrees Fahrenheit. Bake for 30 minutes, flipping them halfway. This step is key to keep their texture right for the wreath.
Next, it’s time to fold the filters. Fold each one in half, then in half again into a cone shape. This folding method is important for tight, full sections in your wreath. Then, squish the bottom of your cones. This makes them easy to stack. Keep them stored in a dry spot until you’re ready to build your wreath.
Keeping your coffee filters in good shape is crucial for a lovely, lasting wreath. Good preparation is the secret to successful coffee filter crafts. How you fold and care for these pieces will have a big impact on your wreath’s look.
Assembling the Wreath
Starting your homemade wreath creation is easy once you have your materials ready. Just follow these assembly instructions for DIY wreath for a great-looking and strong wreath.
- Begin at the Inner Edge: Start by attaching your coffee filters at the inner edge of the foam form. Use straight pins rather than glue for easy adjustments. This makes crafting a coffee filter wreath more flexible.
- Overlap the Filters: Put the filters close together, making sure they overlap to look lush and full. Be sure to spread them evenly to avoid gaps.
For a 9-inch wreath, you will need about 100-150 coffee filters. If you want a colorful wreath, use 18-25 filters for each of the 6 colors. A bigger, 12 or 14-inch, wreath requires at least 300 coffee filters.
Putting the wreath together usually takes 1-2 hours. But, dyed filters may need an extra 1-2 days to dry. Here’s how long each step takes:
| Task | Duration |
|---|---|
| Preparation of Coffee Filters | 23 seconds |
| Floral Coffee Filter Assembly | 21 seconds |
| First Layer of Wreath Assembly | 36 seconds |
| Additional Layers of Filters | 38 seconds |
| Adding a Decorative Bow | 13 seconds |
| Adding a Candle Holder | 19 seconds |
Pinning your wreath’s elements together lets you adjust as you go. This saves time and makes sure your homemade wreath creation is just right. It should look good and last long if kept dry and stored right. By following these assembly instructions for DIY wreath, your wreath will beautify your home for many seasons.
Adding Finishing Touches
Now that your wreath is ready, it’s time for the best part: adding your own touches! Making your DIY wreaths personal is what makes them special. There are many ways to do this. For starters, think about decorating homemade wreaths with colorful ribbons. Adding a splash of color not only looks good but also makes your wreath unique.
To personalize your DIY wreaths more, try painting coffee filters. Pick colors that match your home or the season. Like red and green for Christmas, or soft tones for spring. This easy step changes the whole look, making the wreath truly yours.
You can also add things like fake flowers, berries, or small decor for the season. Adding pinecones for winter or sunflowers for summer brings your wreath to life.
For a modern look, hang your wreath with invisible fishing wire. This makes it look like it’s floating, fitting perfectly in any room. It also adds an eye-catching depth to your wreath.
Below is a useful table to help you track what you spend and what you need:
| Item | Cost | Usage |
|---|---|---|
| 700 Coffee Filters | $2.59 | 200-300 filters per wreath |
| Straw Wreath Form | $1.00 | 1 per wreath |
| Decorative Ribbon | $0.50 | 1 per wreath |
This project is great for those watching their budget. It doesn’t cost much, but you can do a lot with it. So, let your creativity take flight as you finish your DIY projects. Enjoy crafting!


✄ SIZE: Width - 3/8 inch/ 9mm, Length - 36 yards, can be stored easily. These ribbons come in a wide range of colors and sizes.

Neat Spool & Perfect Size for Easy Use: Tangle-free and ready to use, this 2-inch wide, 11-yard long burlap ribbon featuring elegant white lace comes neatly wound. It’s the perfect burlap roll bulk supply to keep your craft room organized while ensuring effortless dispensing and precise cutting for every delicate project
Caring for Your Coffee Filter Wreath
Maintaining DIY wreaths made from coffee filters is key for their longevity. You’ll want your wreath to look good for many seasons, even years. Following simple steps can keep your homemade decorations vibrant and long-lasting.
Keep your wreath away from moisture at all costs. Water can ruin coffee filter wreaths by changing their shape or color. If it’s been outside, bring it in during rain to avoid damage. It’s best to display your wreath indoors to keep it looking its best.
Clean your wreath gently to avoid damage. If it gets dusty, lightly brush it off or use a can of compressed air. Never use water or cleaners on it. Also, store it carefully in a solid box with enough padding. This helps keep its shape and protects it from sunlight that can fade the colors.
If you follow these tips, your coffee filter wreath will stay beautiful for a long time. No matter the occasion, like Mother’s Day, Christmas, or Halloween, proper care will keep your decor looking great. With some care, your DIY wreaths will continue to be a delightful part of your home.

