Decorating a wire wreath frame is both fun and rewarding. It’s easy for anyone to try, from experienced crafters to newbies. This guide shows you how to turn a simple wire frame into a gorgeous piece. In just half an hour, you’ll have a beautiful wreath ready to enhance your home’s look.
First, picking the right supplies is key. Start with a 16-inch wire wreath frame. Then, grab some affordable decorations from a craft store. You have many options for ribbons, deco mesh, and other decorations to make your wreath stand out.
In our homemade wreath guide, we discuss building a solid base with foam. Then, we add things like dried flowers or little pine cones for a seasonal touch. You’ll find ideas for all seasons—fall, winter, spring, or summer. And if you’re in a hurry, try using a pre-made grapevine or straw wreath to save time.
Key Takeaways
- Prep time for decorating a wire wreath frame is only 15 minutes.
- Using a 16-inch wire frame is recommended for an optimal size.
- A basic wreath decoration project can be completed in 30 minutes at a cost of around $10.
- Consider using an assortment of dried lavender, artificial flowers, and decorative ribbons for a personalized touch.
- Pre-made grapevine or straw wreaths can significantly cut down on preparation time.
Choosing the Right Size and Shape for Your Wreath
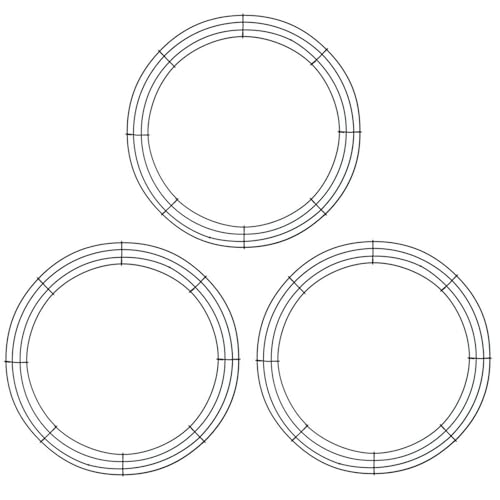
When picking wreath frames, it’s key to know the various wire wreath sizes and shapes available. Common sizes range from 8 to 16 inches. The right size often depends on where you’ll display it. For instance, a 16 to 18-inch frame works well for front doors. Smaller ones are great for windows or inside your home.
Wire frames offer lots of shapes to choose from. Circular, square, and heart-shaped ones are particularly popular. The best shape largely depends on your theme and where you’ll put it. Circular frames give a timeless feel, while heart shapes are perfect for romantic events.
There’s a wide choice of materials for wreath making. You can use synthetic ones like plastic and fabric, or natural ones like vines and twigs. Natural vines and twigs are great for rustic or seasonal wreaths. For light wreaths, try using styrofoam covered with yarn or fabric. Wire frames are best when adding fabric, mesh, or burlap. Straw forms are great for earthy designs, especially in the fall and spring.
Different bases support your wreath’s look, including polystyrene, rattan, straw, and wicker. Polystyrene rings are easy to work with and good for floral wreaths because they’re light. For outside wreaths, rattan rings are strong and durable. Wicker brings a rustic vibe, perfect for the trend towards natural crafting materials. Each base offers its benefits, helping you get the right look for your project.
In summary, knowing about wire wreath sizes and shapes helps a lot in wreath making. Whether it’s for a holiday decoration or a year-round item, choosing the right wreath frames is crucial. They provide a strong base for creating both beautiful and lasting designs.

Easy to Use wreath wire wreath frame

Sturdy Metal Construction: this Christmas wreath frame is crafted from iron wire, making the wire wreath frame robust and long-lasting; the wire wreath frame is coated with green paint to protect the metal wreath frame from corrosion, allowing you to reuse them multiple times for various festive decorations
Gathering Your Decorating Materials
To make a stunning wreath, you need the right supplies. The materials you pick will shape your wreath’s theme and look. DIY wreath makers often use fresh or dried flowers, burlap ribbon, fabric pieces, and natural stuff like pinecones and berries. Adding an authentic touch, gather branches, vines, dried blooms, seed pods, and colorful leaves in the fall. This season is best for finding nature’s crafting treasures.
You can find these materials at craft stores such as Michaels or Hobby Lobby. Or, look around your backyard for natural finds. Spring is great for morel mushrooms, and summer offers wildflowers. You’ll also need tools like a hot glue gun, floral wire, and wire cutters. Start with a solid base—try a grapevine, wire frame, or straw form.
Set up a workspace to save time. This move can cut your crafting time by about 20-30%. Begin with a durable bottom layer. Then add more layers for depth and color. Secure your layers with wreath wrap and moss pins to keep everything in place. This tactic lessens the chance of moss falling by 70% and keeps decorations tight by up to 60%.
Reusable wreath bases help the planet by cutting down on waste. A base of moss keeps greenery fresh longer, by holding moisture. This can keep your wreath lively for 6-8 weeks or more, with regular watering.
It’s important to know where to get wreath decorations without spending too much. Dollar stores and thrift shops are good places to look. Or use things you already have for a special touch. Mixing 3-5 types of greenery in each little bunch adds variety and balance. This makes your wreath look better overall.
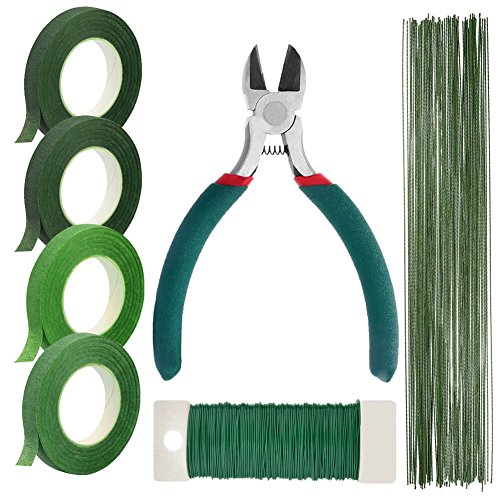
FLORAL ARRANGEMENT TOOLS INCLUDED – 100 pieces green stem wire 26 gauge, 114 feet green paddle wire 22 gauge, 4 rolls green floral tape and 1 pair wire cutter. These supplies are all you need for DIY flower arrangements, bouquets, and boutonnieres etc.
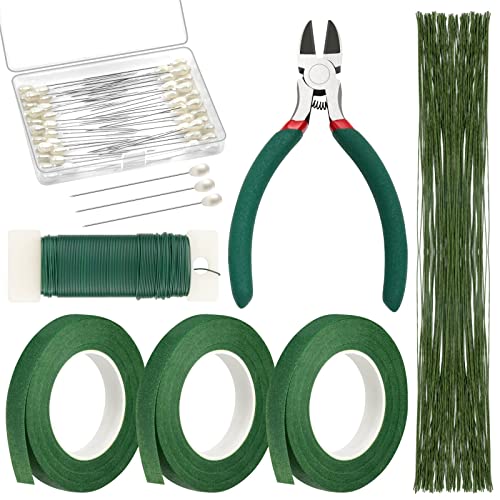
FLORAL ARRANGEMENT KIT INCLUDED – 100 pieces green stem wire 26 gauge, 114 feet green paddle wire 22 gauge, 3 rolls dark green floral tape, 50pcs corsage boutonniere pins and 1 pair wire cutter. These wreath making supplies are all you need for DIY flower arrangements, bouquets, and boutonnieres etc.

Flower arrangement kit includes: a pair of floral wire cutters, 50 long pins, 3 rolls of wrapping tape, 100 pieces of 14.4 inch (36.5 cm) green flower paper wrapped wire, and 1 roll of 75 ft (26 m) green wire( 26 gauge wire ), making it an ideal setup for flower arrangement enthusiasts
Creating a Base for Your Wreath
Making a stable and good-looking base is the first thing to do when making a wreath. It’s very important to think about how it looks and works. A lot of people use a 12-inch wire frame. But if it’s for your front door, a bigger 16 or 18-inch frame makes it stand out more. Start by covering the frame with something like burlap or floral tape. This hides the metal and helps things stick to it better.
The foundation is key to evenly place and hold decorations all around the wreath. To keep it structured, wrap each group of greens with paddle wire 3 to 5 times. The pieces should be between 4 to 6 inches long. For a natural look, go for lengths between 4 and 8 inches. As greens shrink when drying, it’s crucial to tie the wire tight.
Using a moss base is great because it keeps the greenery fresh longer, around 6-8 days. It can even last longer if you water it regularly. To hold the moss, tie the wire around it every inch. Make sure each group of foliage covers the one before it for full coverage.
On the other hand, a foam wreath base is simpler to use because you can stick foliage directly into it. Yet, a moss base on a wire frame is often chosen for its looks and ability to hold moisture. For those who like using wire frames, this method is more flexible and lasts longer.
Having a well-set-up space is key for making a great wreath. Use a big table or a crafts bench for this. When you add decorations like pine cones, putting them in odd numbers (like 1, 3, or 5) looks better. Try placing decorations before you fix them to see how they look best.
To finish, tie off the wreath well, usually with the wire wrapped 2 to 3 more times. Doing this makes sure the base is secure and ready for the next steps in your project.

HIGHER QUALITY - The wreath frame is made of high quality iron wire, which is sturdy enough and not easy to break, it is easy to make a beautiful wreath with this metal wreath.

Sufficient quantity: comes with 6 pieces wire wreath frames measure approx. 12 inches/ 30 cm in diameter; Enough for you to arrange a decoration, also have spare for replacements and DIY

Package Included: You will receive 2 pieces of wreath form measuring approximately 12 inches in diameter, offering a suitable size and quantity for crafting Valentine's door wreaths or seasonal decorations. This set provides ample wreath making supplies to support art projects, floral arrangements, and DIY crafts with ease
Adding Decorative Elements to Your Wreath
After creating a sturdy wreath base, it’s time to have fun decorating. You can choose a design that’s either symmetrical or asymmetrical>. To attach decorations, you might wire them, tie them with ribbons, or use glue.
Start by picking decorations you like, such as pinecones or dried flowers. When attaching them, begin with the bigger items. Secure them with floral wire wrapped around both the decoration and the wreath frame. This is great for attaching things like wood ornaments or large faux flowers.
To add a touch of class, try using ribbon. Wrap the ribbon around the decoration and tie it onto the wreath tightly. This method is perfect for lighter decorations like fake leaves or small baubles.
Hot glue can be used for lighter decorations too and applied carefully to keep things neat. For a textured look, place large items first, then add smaller ones on top. This fills in spaces and adds depth.
- Attaching decorations to wreath with wire: Ideal for sturdy, heavy items.
- Tying with ribbon: Provides security and adds style, best for light items.
- Using hot glue: Great for delicate items, gives a clean look.
Add different textures and colors to make your wreath stand out. Mix various materials for a unique look. For example, mixing a rustic wood slice with bright silk flowers creates an eye-catching effect.
Remember, there’s no limit to DIY wreath design ideas. Feel free to try new things and adjust until you love what you see. Look at your wreath from different sides to make sure it looks good all around. It should show off your unique style and creativity.
| Technique | Materials | Benefits |
|---|---|---|
| Wiring | Wood slices, large flowers | Strong hold |
| Tying with Ribbon | Light decorations, leaves | Elegant and secure |
| Hot Glue | Small baubles, delicate items | Clean application |

VALUABLE PACKAGE: You will receive 4 rolls of wired edge ribbons, featuring 2 green rolls and 2 Pink rolls, providing enough supplies for your daily crafting and gift wrapping needs.

ELEGANT FLORAL DESIGNS: Includes 4 rolls of decorative fabric ribbon with spring themed patterns. These floral ribbons feature pink roses, leaves, and coordinating botanical motifs

PACKAGE CONTENTS: This set includes 2 rolls of decorative fabric ribbon, each measuring 2.5 inches wide and 5 yards long, providing a total of 10 yards of premium spring-themed ribbon for multiple projects
Finishing Touches and Display Ideas
Once you’ve added all your decorations, it’s time for the final steps to make your DIY wreath stand out. Take a moment to step back and look at what you’ve made. Adjust anything if needed to make sure it looks great. If you’re going to put your wreath outside, think about adding a protective layer. This will keep it looking bright and last longer.
There are many ways to show off your wreath. For a traditional look, hang it on your front door with a ribbon. If you want to display it inside, special hooks for walls are a good option. Wreaths can also decorate vintage window frames, dining chairs, or even chandeliers. No matter if you’re brightening your living room or welcoming guests at your door, choosing the right way to display it can make your wreath even more stunning.
To make sure your wreath stays beautiful for more seasons, it’s important to store and take care of it properly. Keep it in a cool and dry spot, best in a box made for wreaths or a plastic container. This helps avoid dust. With wreaths now popular for every season—fall, winter, spring, and summer—you’ll be glad to have one ready to use any time.
Adding small things like twinkle lights can really make your wreath shine, especially in winter. About 25% of people use wreaths as the main decoration on their dining tables, often with candles or other decorations. This shows wreaths aren’t just for doors. They’re versatile decorations for anywhere in your house. By putting the final touches on your DIY wreath and considering how to show it off, you can create a big, stylish effect in any space.

Spray on to outdoor gear made of plastic, vinyl, or neoprene to protect it from UV damage and sun deterioration

Strong fabric protection repels water based spills for easier cleanup

Superior UV inhibitors protect against color fading, peeling and cracking caused by the sun on Outdoor Garden and Décor

