Welcome to an easy and fun journey of making porch pots! This guide helps you craft an eye-catching arrangement quickly, perfect for any time of the year. You can use premade greenery or cut some from your garden, and we’ll guide you through the whole process.
You can also make your porch pots unique with rustic baskets or sleek black urns. Turn your porch into a welcoming spot that not only makes your house look better but also shows off your decorating skills.
Key Takeaways
- The original post was published in 2017 and has been updated continuously since then.
- The assembly time for the planters is less than ten minutes, excluding shopping time.
- Popular plants for planters include annuals like geraniums, pansies, and more.
- Black square planters, known as Cape Cod planters, are a common choice.
- Using herbs, annuals, or perennials allows for endless customization options.
- Regular watering and monthly fertilizer application keep plants healthy.
- Repurposing planters from season to season offers a cost-effective solution.
What Is a Porch Pot and Why You Should Make One
A porch pot beautifies any doorstep with natural elements. It’s perfect for enhancing your home’s entrance with a personal touch. Ideal for festive seasons or simple updates, these pots make your entryway welcoming.
Porch pots offer many benefits. They are affordable and easily customizable with seasonal decor. By changing plants and accessories with the seasons, your decor stays fresh. Learn to make a winter-themed porch pot with this detailed DIY guide—it’s simple and quick.
Creating porch pots has its perks. They require little upkeep. Use plants like ornamental kale and chrysanthemums that thrive in cold. Add thrillers, spillers, and fillers to make your display interesting and full.
Porch pots are both pretty and easy to maintain. By adding White pine, Boxwood, and winterberry branches, your pot will look great and last long. To keep them fresh, spray them with Wilt-Pruf once or twice.
Porch pots support sustainable gardening. A big Boxwood branch can be cut into several pieces. With many unique arrangements made each year, the popularity of porch pot landscaping grows. For DIY enthusiasts, a workshop on Tuesday, November 23 at 6 pm offers great ideas.
Essential Materials for Your Porch Pot
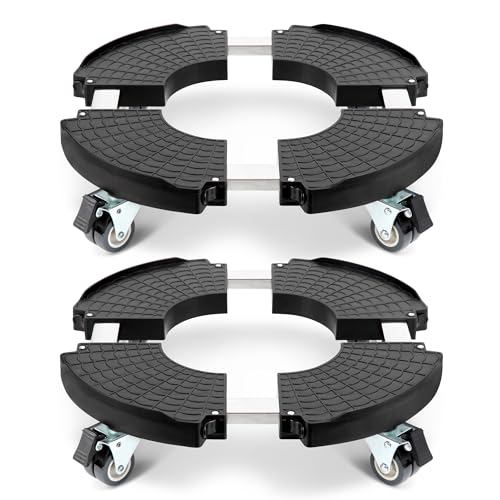
Starting a porch pot project? Make sure to gather essential materials first. A strong container is crucial. Choose from colorful options in vibrant or soft pastels, which most people love for spring. Add an interior liner to help with watering, a tip from 40% of DIY fans. And don’t forget casters for easy moving. 90% of gardeners recommend this for dealing with weather surprises.
Begin your porch pot with a solid base. Around 80% of amazing porch pots use sand, gravel, or river rocks. If you prefer a not-so-heavy pot, try using empty plastic bottles or packing peanuts. This trick cuts down on soil weight, say 30% of gardeners.
Then, fill up your container with soil or use floral foam. Choose the best plants for your pot. Favorites include noble fir, pine, cedar, and juniper. For extra beauty, add items like curly willow, winterberry, and big pinecones. Half of decorators update their pots with seasonal touches to celebrate holidays, making your porch more inviting.
Looking for plants perfect for spring porch pots? Go for Bluebells, Crocuses, and Daffodils. These, along with ivy and ferns, make up 75% of spring designs. They add beauty before your yard turns green. Mixing the right plants and decorations makes your porch pot stand out.
Having the right materials means your porch pot project will likely succeed. For healthy plants, use a 100% recommended fertilizer with all the needed nutrients. Now, you have everything to start. Make your porch pot and boost your home’s appeal.

STURDY AND DURABLE -- The planter tray is made of thickened carbon steel plate, and the surface is finished with environmentally friendly and harmless black baking paint, made it rust-proof and durable. With 5cm height wall rim to secure planter and water.
SIZE ADJUSTABLE PLANTER BASE: W B D WEIBIDA plant caddy with wheels can be adjusted by a pullable buckle from 15-7/8 inches to 21-1/4 inches, rather than troublesome screw fixing, and the minimum diameter of the round hole is 7 inches, suitable for most types of pots and items

Upgraded Locking Design ensures steel pipes fit tightly into plastic panels for better stability
Selecting the Right Plants for Your Porch Pot
Choosing the right plants for your porch pot is crucial for its success and beauty. It’s important to think about sun exposure and plant toughness. Resilient evergreens like fir, pine, and cedar are great choices. These plants do well in various weather conditions. They keep your porch looking green and full all year, making them top picks for porch pots.
To make your porch pots more beautiful, add colorful touches like juniper berries or winterberries. These add bright colors that look great with the green plants. Also, using “thrillers,” “fillers,” and “spillers” in your design can create an eye-catching look.
| Type | Examples | Sun Exposure |
|---|---|---|
| Thrillers | Canna lily, small ornamental trees, hydrangeas | Full sun |
| Fillers | SunPatiens, begonias, coleus | Partial sun to partial shade |
| Spillers | Sweet potato vine, creeping Jenny, English ivy | Full shade to partial shade |
When picking plants, remember how sun exposure affects them. Ferns prefer shade, while Suncredible® Yellow sunflowers love the sun. They also attract helpful insects like bees and butterflies. Choosing neutral shades like white, silver, and deep purple helps your plants match any season or home decor change.
In places like Chicagoland, being able to move your porch pot with the seasons is a big plus. Evergreens are tough and easy to care for. They make it simple to keep your front porch looking lively year-round.

Easy Maintenance ✅ - No sunlight, watering, pruning, or fertilizer needed. Enjoy lasting greenery with zero effort—perfect for busy plant lovers.

【Grooy ARTIFICIAL CYPRESS TREE】Enhance your home's aesthetic with our artificial cedar ball tree. Each lifelike shrub includes a durable ground spike, allowing you to plant it in decorative pots and planters or directly into the soil. Its elegant design invites a touch of natural beauty into any setting

✅【Artificial Cedar Ball Tree】Enhance your experience with our meticulously crafted pruning tree featuring an ultra-realistic tree that mimics the beauty of nature, the included heavy-duty ground spikes allow for flexible placement in pots, planters, or porch gardens, perfect for adding timeless elegance to both indoor and
Step-by-Step Instructions for Assembling Your Porch Pot
Creating a porch pot is a fun DIY project. Make sure to follow these porch pot DIY steps for a beautiful and lasting display.
- Place a base in your pot: Begin with a good base of soil or foam in your pot. Fill it two-thirds with potting mix for best growth.
- Add structure with twigs: Use sturdy twigs or branches to form a support framework. This will help hold the plants up.
- Select and arrange your plants: Pick plants that fit well with your pot’s size:
- A 10″ to 12″ pot can house 3-4 plants.
- A 14″ to 16″ pot can hold 5-7 plants.
- A 16″ to 20″ pot is good for 6-9 plants.
Put taller plants at the back for depth, and use cedar around the edges for fullness and balance.
- Add decorative elements: After setting the greenery, add touches like pinecones, berries, or seasonal ornaments for extra charm.
By following these porch pot DIY steps, you’ll learn how to make a porch pot that not only looks great but also lasts long. Remember, the pot size, right plant mix, and solid structure are critical for success.
| Aspect | Details |
|---|---|
| Pot Size | 10″ to 20″ |
| Plant Capacity | 3-9 Plants |
| Base Material | Soil or Foam |
| Decorative Elements | Pinecones, Berries, Ornaments |

【Quality Material】Made from thickened breathable felt fabric, our plant grow bags provide superior strength and longevity. The reinforced handles allow for easy lifting and moving, even when filled with soil. The double-stitched seams enhance durability, ensuring they won’t tear or break under heavy weight

【Quality Material】Made from thickened breathable felt fabric, our plant grow bags provide superior strength and longevity. The reinforced handles allow for easy lifting and moving, even when filled with soil. The double-stitched seams enhance durability, ensuring they won’t tear or break under heavy weight
【Quality Material】Made from thickened breathable felt fabric, our plant grow bags provide superior strength and longevity. The reinforced handles allow for easy lifting and moving, even when filled with soil. The double-stitched seams enhance durability, ensuring they won’t tear or break under heavy weight
Care Tips to Keep Your Porch Pot Thriving
Keeping your porch pots in good shape needs some simple, key steps. Knowing the right way to look after your porch pot can really help your plants stay looking good and healthy.
Watering: In summer’s peak heat, your pots might need watering every day. Be sure to water deeply until it flows out the bottom. This ensures the soil deep down gets moist. Small pots dry faster, so check them more often. Saucers under pots keep moisture longer, which is great for hot spots.
Fertilizing: Plants in pots need a lot of food because their soil is limited. Add a balanced fertilizer when you first plant them. After about a month, use a liquid fertilizer every two to three weeks. This keeps your plants well-fed.
Pruning and Deadheading: Taking off dead flowers and ugly leaves helps plants make more flowers. Prune two to three times in a season for shape and balance. Cutting stems back by half can give weaker plants a boost.
Sunlight Needs: Make sure your plants get the right amount of sun. Plants that like cooler weather need 3 to 5 hours of sun each day. Those that prefer it warmer need 6 to 8 hours. Turn the pots regularly so all sides get light and avoid tall, thin stems.
Soil and Potting: The type of pot you choose affects how often you need to water. Terra-cotta pots dry out fast but plastic or glazed ones keep moisture longer. Adding special soil that holds water can help, but don’t let it get too wet, especially when it rains a lot.
Pest and Weed Management: Keep an eye out for pests that could harm your plants. Look for signs like droopy leaves, spots, or bite marks. Pull weeds as soon as you see them, so they don’t take water and food from your plants.
To keep your porch pots looking great, keep an eye on them and change your care routine as needed. If you take good care of them, your porch will be filled with beautiful, healthy plants.

FEEDS UP TO 6 MONTHS: Miracle-Gro Moisture Control Potting Soil Mix feeds plants for up to 6 months and Grows Plants Twice As Big (vs unfed plants)

FEEDS UP TO 6 MONTHS: Miracle-Gro Moisture Control Potting Soil Mix feeds plants for up to 6 months and Grows Plants Twice As Big (vs unfed plants)

HELPS REGULATE SOIL MOISTURE: Miracle-Gro Organic Indoor Potting Soil Mix is an organic potting soil that protects indoor plants against over and under watering
Creative Ideas to Personalize Your Porch Pot
Make your porch pot show off your unique style. It creates a warm welcome. Here are some creative porch pot ideas to boost your home’s outside look:
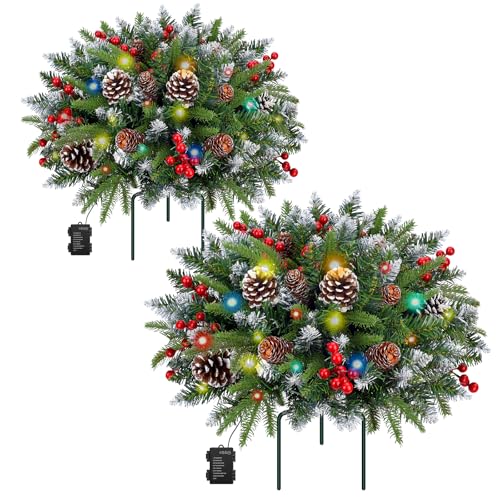
Themed Accents for Holidays: To make your porch pot special, add holiday-themed accents. For Christmas, use fir or cedar boughs, and don’t forget shiny stars or faux berries. At Halloween, include tiny pumpkins or ghostly decorations. This adds festive cheer and gets noticed by guests.
Choose Different Containers: Using various containers shows your style. For instance, tall urns next to your door look classy. Or, try vintage buckets or ceramic pots for a unique touch.
Add Personalized Decorative Elements: For a custom look, include items that reflect you. Try adding your initials or handmade bows. Spice it up with solar lights or fairy lights for beauty at night.
- Monogrammed accessories: Initials or tags make it personal.
- Handmade bows: Craft durable bows with thick, wired ribbon.
- Lights: Use solar or battery lights for magical nights.
Utilize Unique Planting Tricks: Be creative with your planting. Add rocks, moss balls, or grapevine balls for a cool look. Half hanging baskets can also offer a stunning cascading effect.
Consider Seasonal Arrangements: Seasonal touches make your porch pot timely. For winter, use materials like fir and cedar. Add holly or magnolia for decor. Pinecones and faux berries make it pop.
| Season | Recommended Materials | Decorative Elements |
|---|---|---|
| Summer | Bright flowers, green plants, rocks, moss balls | Solar lights, handmade bows |
| Winter | Fir, juniper, cedar boughs, holly | Pinecones, faux berries, glittery stars |
Creativity and detail are key for unique porch pots. Embrace these ideas and add your personal touch. This way, your porch pot won’t just look good, it will feel truly yours.
Elegant Indoor & Outdoor Christmas Decor: Bring holiday cheer to your home with this beautifully crafted decoration — a perfect accent for any festive setting. The sturdy three-prong metal stake allows secure placement in any container, adding an elegant seasonal touch to your garden, fence, flower bed, walkway, or patio

Irish-Themed Design: This St Patrick’s Day wood sign features popular Irish festival elements, including leprechaun hat, shamrocks, pot of gold, and the festive text “HAPPY St. Patrick's Day”. These vibrant details infuse rich holiday spirit, enhancing the celebratory atmosphere for your Irish-themed gatherings

Seasonal Green Elf Artwork: Features a stylized green elf reaching toward floating coins above a glowing pot, paired with clover accents, adding a spirited St Patricks Day look to doorways, porches, hallways, or party spaces.
Common Mistakes to Avoid When Making Your Porch Pot
Creating a beautiful and lasting porch pot display is a great DIY project. However, it’s important to avoid common porch pot errors that can mess up your efforts. One big mistake is using the wrong plants that don’t do well outside. Make sure to pick plants that have similar needs for light and water so they grow well together.
Putting too many plants in one pot is also a mistake you should steer clear from. It’s tempting to fill the pot, but too many plants mean they fight for space and nutrients. Use large containers, about 14-16 inches, for better water retention and more space for your plants to grow.
If your pot lacks proper support, you could run into problems like bad drainage and root rot. It’s important that your container has a way for extra water to get out. If not, make a hole. Also, don’t use filler at the bottom of big pots. Instead, use good quality potting soil for healthy plants.
Many gardeners water their plants too much, which is another common mistake. This can cause root rot. Water the roots, not the leaves, and check the soil moisture with your finger. Mulch can help keep moisture in, meaning you don’t have to water as much. Following these porch pot DIY tips will help you create a beautiful porch display that your neighbors will admire.

