Learning to make a screened porch can really make your home nicer to live in. This guide will show you how to create an outdoor space that’s both pretty and useful. You won’t have to worry about bugs anymore. No matter if you love DIY projects or want to get better at them, this guide is here to help. It covers everything from planning your porch, building it, to keeping it nice over time.
Key Takeaways
- Planning is crucial for creating an effective design for your screened in porch.
- Gather all essential tools and materials to ensure a smooth construction process.
- Proper preparation of the construction area can save time and effort.
- Building a sturdy frame is critical for the durability of your porch.
- Installing the right screening material will keep insects out and let the breeze in.
- Adding a roof is essential for weather protection.
- Finishing touches on both the interior and exterior make the porch more inviting.
- Regular maintenance will extend the life of your screened in porch.
Plan Your Screened In Porch Design
Start by drafting your screened porch designs with care. Sketch out your porch, noting every measurement for support pieces. This step makes sure your porch looks good and stays strong.
Then, think about the screen material you want to use. Fiberglass is easy to work with, while metal is very strong. Choosing the right material is key for a porch that lasts and functions well.
Your porch should look like it belongs with your home. Use weatherproof items like rattan, wicker, teak, and treated woods. Rugs that work inside and outside bring color and coziness.
Adding a fireplace can make your porch warm in cold months. Always check with a pro for safety. Also, choosing gentle colors like grays can make it a calm spot. Or, pick blues and tans with natural furniture for peaceful vibes.
Add special touches like big light fixtures or interesting walls to make your porch stand out. Decorate with throws, waterproof ceramics, and plants to show your style. You can go for a beach look or a cozy cabin feel, making it truly yours.
For more tips on making a welcoming outdoor space, check out this guide to screened-in porch ideas. It’s full of design tips and inspiration.
Gather Essential Tools and Materials
Before you start your screened porch project, it’s important to get all the porch building materials and tools together. Having everything on hand will make building easier and prevent delays.
- Circular saw
- Cordless drill
- Staple gun
- Zinc corner braces
- Screen spline rolling tool
- Reciprocating saw
- Power miter box
- Scaffolding for roof work
Using the right DIY porch tools is key for doing the work well. You might also want to rent scaffolding for the roof. This is good advice if your design has parts that go over your head.
When thinking about porch building materials, you should know:
- Fiberglass window screen or metal mesh
- Pressure treated wood
- Screen framing systems
- Pet-resistant screens for durability
Fiberglass screens are great for seeing through, while aluminum screens last longer and can take bad weather. Choosing good screens means they could last up to 20 years.
Now that you have all your DIY porch tools and materials, you’re all set. You’re ready to make a screened porch that adds more space and value to your house. Keeping your work area tidy is very important for a smooth project.
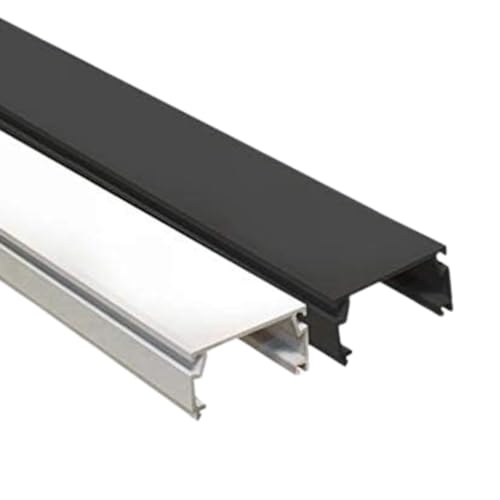
Complete Porch Screening System - The Fast Track screen porch track system includes aluminum Fast Track sticks, clips, hex head screws, and flat screen spline. This versatile screen in porch kit provides everything you need to easily install your own porch or window screen, allowing you to enjoy the outdoors without the nuisance of insects. Just add your preferred screen for porch mesh and transform your space with a sleek, professional finish.

Continuous Cap Roll – The Screen Tight system cap is now available in continuous rolls in easy-to-handle project packs. Trim to your exact dimensions and eliminate waste - the perfect fit for your next screening for porches project! Each cap is 96 inches long, offering the flexibility to cover expansive porch enclosure areas. The cap works effortlessly with both Screen Tight and MeshGuard systems, offering versatility that’s tailored to your unique project needs.

Complete Porch Screening System – The Mini Track screen porch kit includes 8-ft aluminum track bases, screws, screen spline, and installation instructions. Just add your choice of screen to this DIY screen frame kit and you’ll be ready to install your porch or windmesh ow screen. This all-in-one porch screen kit simplifies the DIY process, giving you professional results with ease.
Prepare the Area for Construction
Before starting your porch project, make sure to clean and ready the area. This first step checks that the ground and any existing roof are safe for the work ahead. Clearing old structures or blockages makes setting up your work area easier and safer.
Getting the right permits is a crucial part of the prep work. You may need permits based on where you live, especially if governed by housing associations. Start by following local rules. This will avoid delays and extra costs, ensuring a smooth start to building your porch.
Measuring your space correctly is key. Accurate measurements mean you won’t waste materials or money. Whether you’re doing it yourself or hiring experts, knowing your space helps control your budget. Look at this table to get an idea of potential costs:
| Screened-In Porch Size | Estimated Cost Range |
|---|---|
| Small Porch (10×10) | $1,000 to $3,000 |
| Medium Porch (12×12 to 16×16) | $2,000 to $5,000 |
| Large Porch (20×20 and above) | $3,000 to $8,000 or more |
Keeping your work area tidy affects how well your project turns out. With everything in its place, work flows better and everyone stays safe. It’s important to have all your tools ready. Think about using temporary supports, like scaffolds, for high-up work.
To wrap up, readying your building space well is crucial for a great porch. By following these steps, you ensure your project is safe, follows rules, and uses resources wisely.
Build the Frame for Your Porch
To start building your porch, you must know the basics of making one. Choose strong wood like Douglas Fir for a lasting structure. First, measure and cut your wood to size to ensure a strong, properly shaped base.
Make sure your porch frame is perfectly square using a speed square. This keeps your porch stable and prevents problems later on. Getting this right is vital; a small mistake could affect the whole project.
Use professional tools for the best frame quality. You’ll need a circular saw, drill, and more for precise work. Consider renting scaffolding to make the job easier, planning for a month’s use.
Always follow building codes and double-check your measurements. A level frame is crucial for your porch’s success. Pressure-treated wood is a smart, cost-saving choice without losing quality.
Have a complete set of carpentry tools ready. Being methodical in each step enhances your porch’s quality and durability. Focus on accurate layout, adding supports and beams, using care and attention to detail.

Say Goodbye to Uneven Gaps – Tired of wobbly or misaligned deck boards? Our deck spacer tool keeps every plank evenly spaced, ensuring a flawless look and reducing the risk of water pooling or wood damage

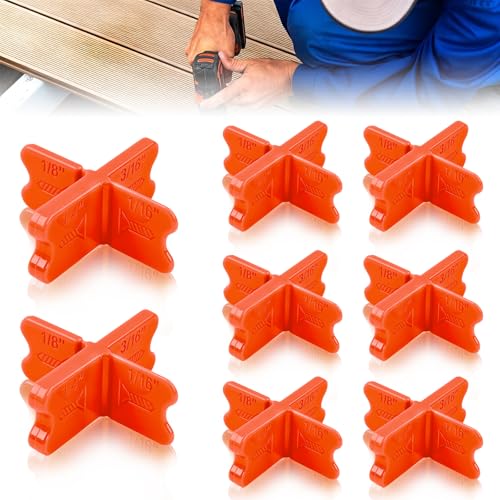
Universal Sizes: 1/16", 1/8", 3/16", and 1/4". These deck board spacers provide precise spacing control for your decking project, eliminating manual measurement errors and ensuring consistent spaces between boards
Install Screening Material
Installing porch screens involves a few key steps and choices to make the installation strong and lasting. First, you need to decide between fiberglass or metal mesh for your screens. Using the right tools is also important. For fiberglass screens, a spline roller tool will help get the screen tight and right. For metal screens, choosing the right spline size is crucial to keep the screen in place.
Begin by placing the screen material over the frame. Secure it by using a staple gun to attach the fabric. Staples should be about 12 inches apart along the joists. Trimming any extra material helps prevent sagging and gaps. When adding vertical base strips, put screws not more than 2 inches from the edges. This makes sure your screen holds up over time.
Keep in mind these screen installation tips:
- Using the Screen Tight system, rescreening a medium-sized porch can be done in one day.
- Add tear-resistant material to lower screen parts in busy areas to make them last longer.
- If staples stick out, use a hammer to flatten them. This makes a smoother surface for the screen.
- Choose solid vinyl doors for screens. They’re tough and don’t need as much upkeep, like painting.
- Using cap trims can hide screws and bolts, making your porch look neatly finished.
Choosing the right screen fabric is vital. Consider what you need and the weather in your area. Fiberglass is popular for its flexibility, favored by 60% of people doing it themselves. Aluminum is tough and lasts long, chosen by 40% of people. There are also pet-resistant and clear-view fabrics for different needs.
A well-done screened-in porch not only keeps bugs out but can also make your home value go up by 10-15%. With careful planning and doing it right, your new porch will be a great addition to your home.

MUST HAVE TOOL – The strong and sturdy screen rolling tool is a must have for replacing window and door screens. It’s extremely economical and adds great value to big and small screen repair jobs. Works with most screening materials.

【All tools in one window screen kit】Are you still avoiding high costs and using worn-out window screens? Now, choose this window screen replacement kit, which includes all tools: window screen, rolling screen tool, screen retainer spline, knife, spline remover hook, and a tape measure. You can finish it within 10 minutes after four steps according to our instructions.

Upgraded version: Well-fitted Nylon wheels are more safe than steel screen door repair rollers, you will never cut your fibreglass screen for windows or screen doors.
Add a Roof to Your Screened In Porch
Adding a roof to your screened-in porch does more than look good. It also makes the porch more usable. When putting in a porch roof, it’s key to measure and fit the materials right. You must also attach the roof securely to your house for it to last.
Different types of roofs like gable, shed, and hip roofs are common choices. Gable roofs are great for water runoff, needing only a 7-degree pitch. Shed roofs fit longer, narrow porches well. Hip roofs give an open feel but may cost more due to extra materials.
For strong construction, use special screws and overlap roofing panels correctly. This helps keep water out. Also, a specific saw blade makes cutting panels precise, showing how accuracy matters in building.
Make your porch roof tough enough to handle bad weather, including high winds. Install parts at the correct lengths for the roof to stay stable. Also, extra steps can keep mosquitoes out, making your porch nicer to use.
To look good, the roof’s bottom was painted with quality white paint. Proper framing was ensured with special brackets. This highlights good building methods.
Screening and roofing a porch costs about $2,800 on average. Prices range based on how large your porch is. Adding a bit extra to your material measurements makes sure you have enough to finish the job.
In the end, a well-installed porch roof boosts the look and use of your screened-in porch. It creates a strong, weather-proof, and inviting outdoor area.

🌞🏡Perfect Size: We’re excited to unveil Domi’s latest 10x14FT Sunroom, designed to offer the perfect blend of comfort and functionality. Whether as a cozy retreat, a garden tea room, or the ideal space for family gatherings, this new sunroom promises an unparalleled experience.

【Galvanized Steel Double Roof with Mesh Design】-The EROMMY Gazebo features a robust galvanized steel double roof, designed to withstand harsh weather conditions. The double-layer construction, combined with a built-in mesh design, provides superior heat insulation, ventilation, and protection from debris, ensuring a comfortable sunroom experience year-round. Perfect for creating a cozy solarium in your backyard

【Galvanized Steel Double Roof】: Sun room Made of galvanized steel, and can effectively prevent falling objects from high altitude. In addition, the double-deck design provides better insulation and ventilation to protect your time outdoors.
Finish the Interior and Exterior
Once you’ve finished the main building steps, it’s time to focus on the porch’s inside and outside look. These last touches can greatly improve your comfort and how nice your screened-in porch looks.
Begin by painting the walls, frame, and trim. This ensures they match your home’s outside and inside look. Pick colors that go well with the environment and furniture. Choose high-quality outdoor paint for weather resistance and indoor paint for long-lasting wear.
Putting in a well-made, stylish door is key to making your porch look better and easier to get into. You can pick from several door types like sliding, French, or traditional screened doors. Make sure the door closes tightly to keep bugs out and the inside comfortable.
Add some decorative trim and moldings around your porch entrances, windows, and roof edges. They can give your porch character and make it feel warm and welcoming. Use materials that resist weather to keep them looking good for a long time.
Decorate your porch with cozy furniture, plants, and other pretty things. Comfortable chairs, tables, and outdoor carpets can make the area a lovely part of your home. Remember to pick furniture that can handle the weather.
Before you start enjoying your new porch, clean up any leftover building materials and make sure it’s safe. Check that everything is sturdy, the screens are without holes, and there are no sharp nails or screws showing. Doing this makes your porch beautiful, safe, and built to last.
By carefully working on the inside and outside of your porch, you can make a place that looks good and works well. These changes will turn your screened-in porch into a great part of your home. It will be a place for relaxation and happiness for many years.

INCLUDES – 2 hooks, 4 medium strips, 1 hook holds 3 lbs

HEAVY-DUTY SHOE BRUSH: Easily clean boots and shoes with strong bristle brushes that remove mud, snow, and dirt. The handy edge and sole scraper are designed to tackle tough clumps and debris efficiently

THE ORIGINAL WEATHERMAX ALL SEASON DOORMAT: Gorilla Grip's Original WeatherMax doormat is built tough with a heavy duty, yet soft and flexible construction; deep grooves, beveled rubber border and retention dam help capture dirt, debris and moisture
Maintain Your Screened In Porch
Keeping your screened in porch in top shape is key. Start by checking the screens often for any damage. If you find tears or holes, fix them right away to keep bugs out and let fresh air in.
Cleaning plays a big role in porch upkeep. Since porches get dirty from people and outside dust, clean often. Use a duster and a microfiber cloth to wipe down surfaces. Cleaning glass parts is also important to remove smudges and marks from pets. Plus, washing pillows and cushion covers keeps your porch feeling fresh.
When it comes to screens, SCREENEZE suggests a mild soapy mix for cleaning. It’s gentle and won’t hurt the screens, unlike power washers which can damage them. It’s also a good idea to protect any wood parts with special wood care products to prevent rot.
Regular care is crucial, especially with changing weather. By doing frequent checks and cleanings, your porch stays nice and usable all year. These tips keep it looking good and last longer, adding beauty and value to your home.

