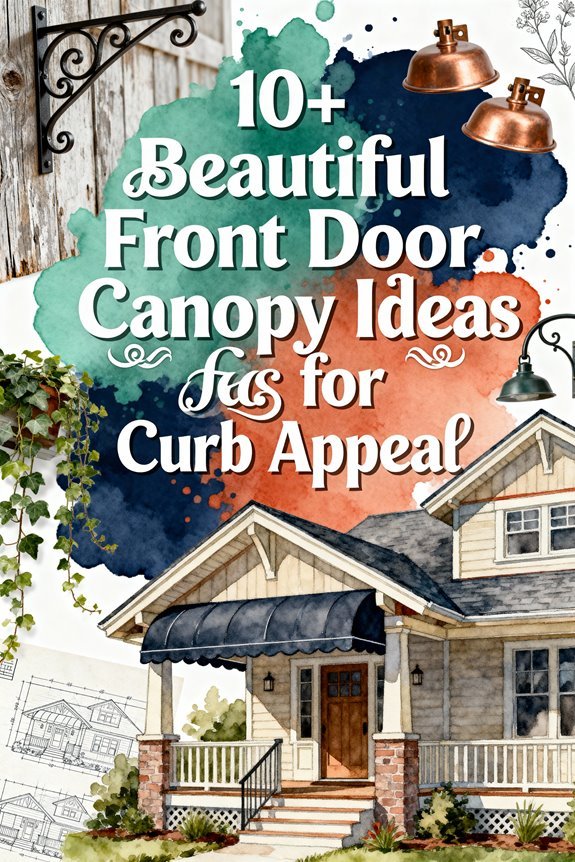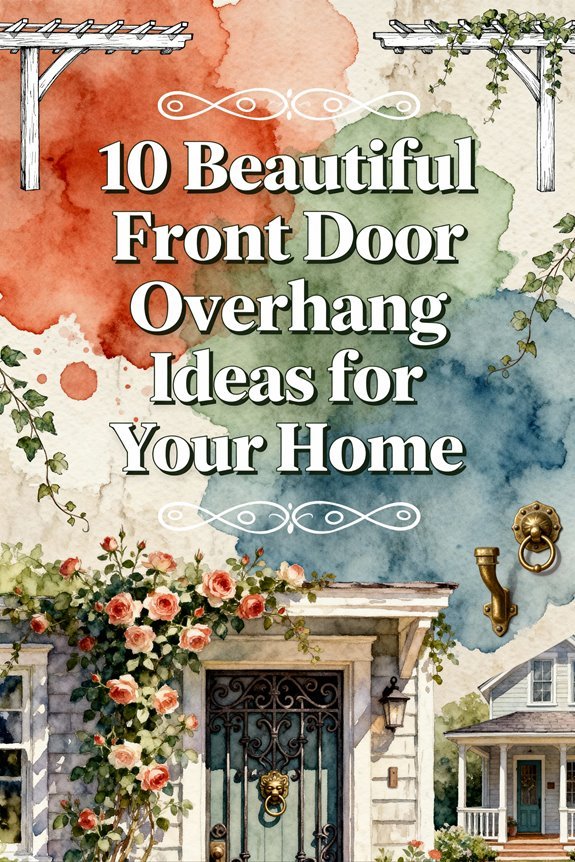
You’ve likely noticed how homes with the most impressive entrances share one specific architectural feature: a well-designed front door overhang. This essential element doesn’t just protect your threshold from weather—it establishes spatial hierarchy, defines your home’s aesthetic language, and creates that critical passage zone between public and private space. Whether you’re drawn to the structural clarity of gable roofs or the minimalist precision of cantilevered designs, you’ll need to understand how each overhang style performs functionally while complementing your home’s existing architectural vocabulary.
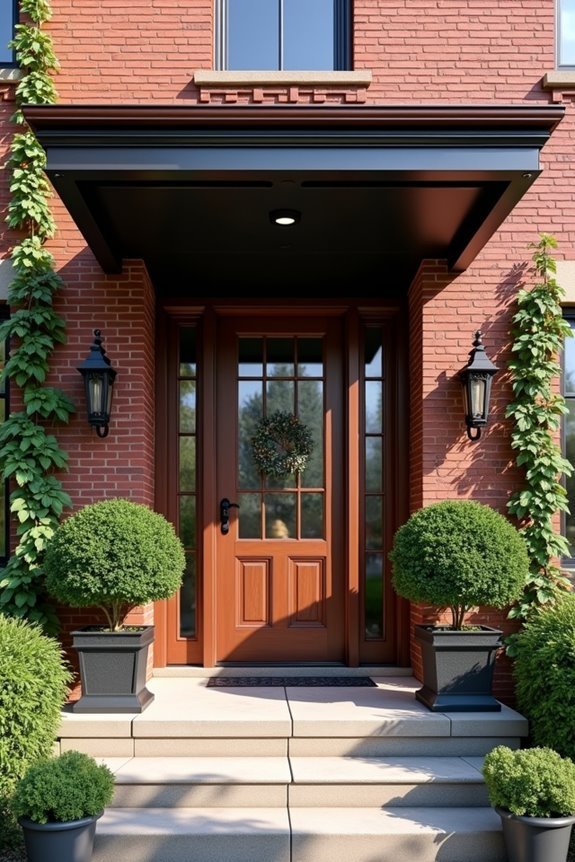
Classic Gable Roof Design
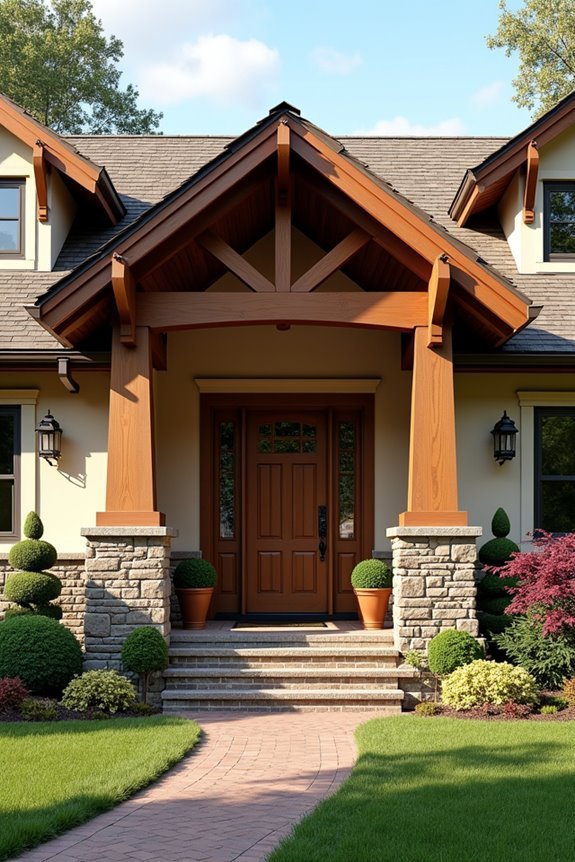
A gable roof overhang stands as the most architecturally straightforward solution for front door protection, featuring two sloped planes that meet at a central ridge perpendicular to your entrance. You’ll appreciate the gable roof benefits immediately: superior water drainage, enhanced structural stability, and increased vertical clearance at the door threshold. The pitch typically ranges from 4:12 to 8:12, determining both aesthetic impact and functional performance.
When considering classic vs modern interpretations, you’re choosing between traditional exposed rafters with decorative brackets or contemporary minimalist profiles with concealed structural elements. The depth should extend 36-48 inches beyond your door frame for ideal weather protection. You’ll need to verify proper fascia detailing and integrate gutters to prevent water accumulation at the entry point.
[affiai keyword=”gable roof overhang design” template=”carousel” count=”3″]
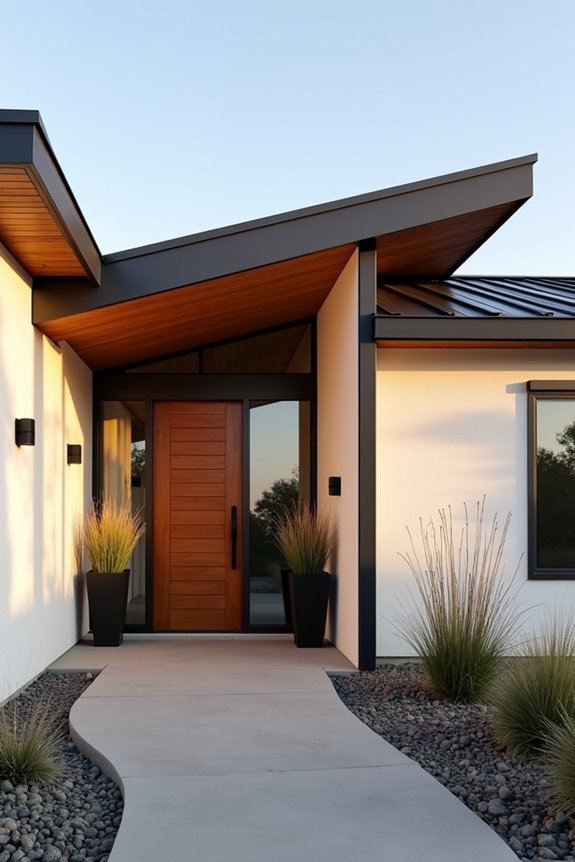
Modern Flat Roof Style

Modern flat roof overhangs deliver clean horizontal lines that complement contemporary architectural vocabularies while requiring precise engineering to address drainage complexities. You’ll need to incorporate a minimum 1:50 slope to prevent water pooling, utilizing modern materials like powder-coated aluminum or composite panels that resist warping. Install concealed gutters within the overhang structure to maintain the streamlined aesthetic. Consider cantilever depths between 24-48 inches, calculated against your building’s proportions and structural capacity. You can integrate LED strip lighting along the underside for architectural drama while enhancing nighttime visibility. Layer rigid insulation above the decking to maximize energy efficiency, particularly critical since horizontal surfaces experience significant thermal transfer. Pair with floor-to-ceiling glazing to amplify the overhang’s protective function.
[affiai keyword=”modern flat roof overhang” template=”carousel” count=”3″]
Arched Canopy Entrance Cover
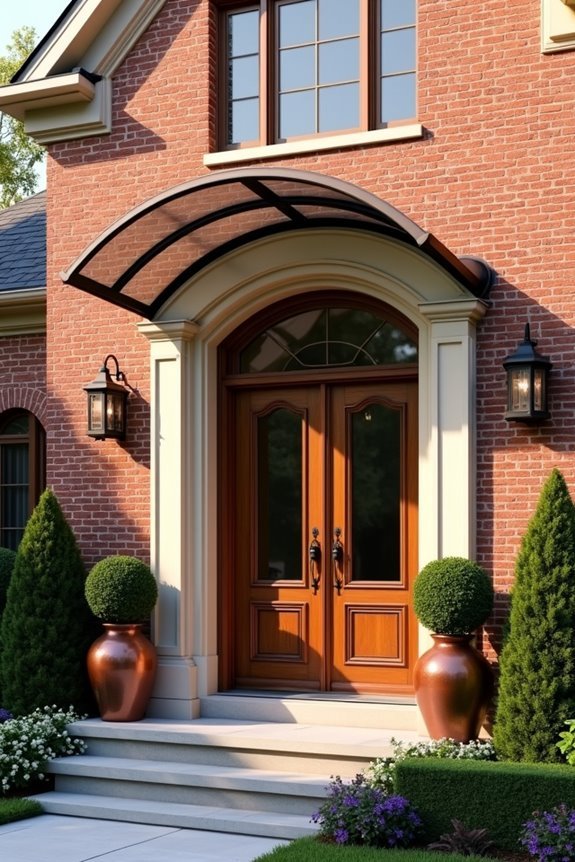
While angular geometries define contemporary overhang design, curved forms create welcoming entrances through softer visual shifts. Arched canopy entrance covers establish architectural continuity between your doorway and roofline through graceful changes that eliminate harsh angles.
The arched design benefits include superior water runoff due to the natural curve directing precipitation away from your threshold. You’ll achieve ideal structural distribution as the arch transfers loads efficiently to support columns. Entrance aesthetics improve through the timeless appeal of curved elements that soften facade compositions.
You can specify shallow radius arches for subtle elegance or dramatic semicircular forms for bold statements. Material selection influences the final expression—steel frameworks support glass panels for transparency, while formed metal or wood beams create solid canopies. Proportional relationships between arch height and door width determine visual harmony.
[affiai keyword=”arched entrance canopy covers” template=”carousel” count=”3″]
⛺【Upgraded Reassuring Materials】【TOP ONLY】The canopy replacement top is made of excellent weather and abrasion resistant 300D durable oxford fabric plus extra strong 250g/m2 PVC polyester layer on the surface with water resistance and UV resistance.The PVC coating is more efficient in waterproof and ultraviolet blocking than other materials. It can block 99% of the sun's UV rays, thus it can protect you and your family's health.

***Exactly what you expect: Your favorite awning is made with one-piece ribbed polycarbonate panels that outperform glass and hollow-core panels for superior impact and load bearing, yet lightweight , ultra-quiet, flame retardant, heat and cold resistant, rain self-cleaning, easy for daily maintenance.
***Exactly what you expect: Your favorite awning is made with one-piece ribbed polycarbonate panels that outperform glass and hollow-core panels for superior impact and load bearing, yet lightweight , ultra-quiet, flame retardant, heat and cold resistant, rain self-cleaning, easy for daily maintenance.
Pergola-Style Open Beam Overhang
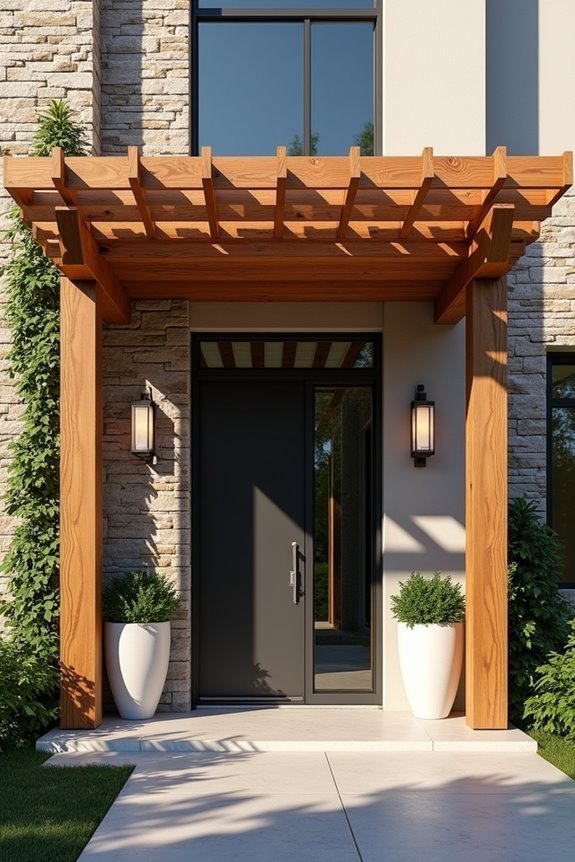
Because pergola-style overhangs introduce controlled shade while preserving visual openness, they transform front entrances into shift zones that blend exterior and interior environments. You’ll achieve architectural depth through parallel or perpendicular beam arrangements that create dynamic shadow patterns throughout the day.
The pergola benefits extend beyond aesthetics—you’re establishing microclimatic control while maintaining sightlines and natural ventilation. Cross-beam spacing determines shade density: tighter intervals provide weather protection, while wider gaps emphasize structure over coverage.
Your design materials selection defines longevity and character. Cedar resists decay naturally, while pressure-treated lumber offers economical durability. Steel beams deliver contemporary minimalism with superior span capabilities. Engineered composites eliminate maintenance while replicating wood grain authenticity. Consider staining protocols and finish compatibility when specifying your material palette.
[affiai keyword=”pergola-style open beam overhang” template=”carousel” count=”3″]
Glass Panel Contemporary Overhang
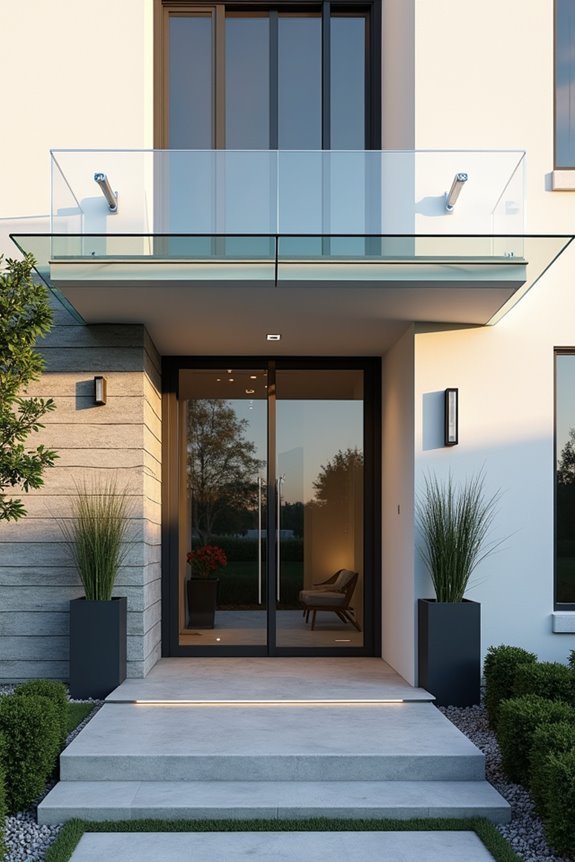
Transparent canopies redefine entry architecture by suspending tempered glass panels above your doorway, creating weather protection without visual mass. You’ll achieve unobstructed sightlines while maintaining functionality through strategically engineered support systems—typically stainless steel or aluminum brackets mounted directly to your façade.
These installations complement modern glass door designs by extending transparency from threshold to canopy, establishing architectural continuity. The frameless configurations amplify aesthetic appeal through material honesty and structural clarity.
Consider low-iron glass for maximum light transmission or frosted variants for diffused illumination. Your mounting hardware becomes a design feature itself—choose minimal standoffs for floating effects or bold cantilevers for dramatic expression.
Proper pitch guarantees water runoff while UV-resistant interlayers prevent yellowing. You’re investing in weather resistance that doesn’t compromise contemporary design principles.
[affiai keyword=”modern glass canopy system” template=”carousel” count=”3″]

Made of high quality stainless steel, this window/door/porch/patio glass awning system hardware is able to hold up to 230lbs (100kg) glass.

All Components Designed from Stainless Steel 316

Made of high quality stainless steel, this window/door/porch/patio glass awning system hardware is able to hold up to 230lbs (100kg) glass.
Rustic Wooden Awning Design
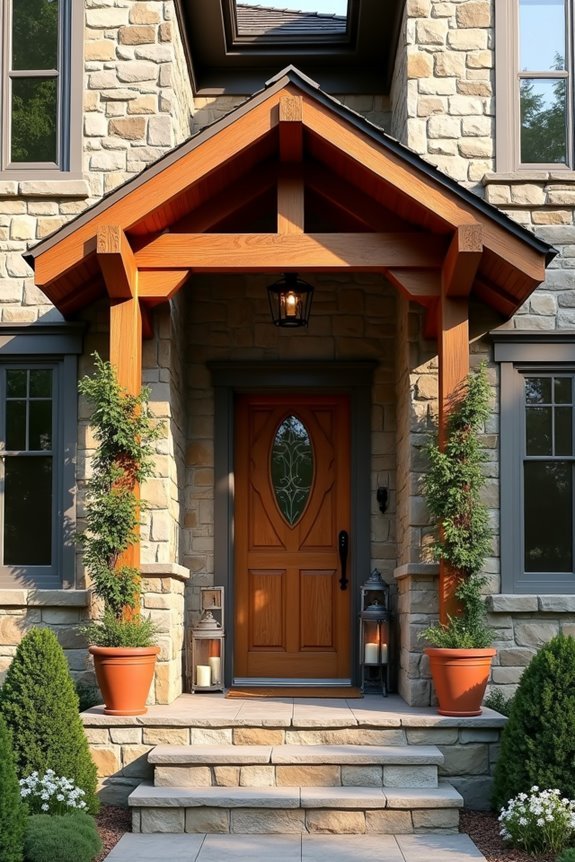
When you select reclaimed timber or rough-hewn beams for your entrance awning, you’re establishing immediate textural contrast against brick, stone, or siding. These natural materials introduce rustic charm while providing structural integrity through exposed joinery and visible grain patterns.
Design your awning with cantilevered timber brackets extending 36-48 inches from the façade, supporting crossbeams that define the overhead plane. You’ll want to maintain beam dimensions between 6×6 and 8×8 inches for visual weight and load distribution. Cedar, oak, or Douglas fir offer weather resistance and dimensional stability.
Install metal L-brackets or hidden steel reinforcement at wall connections, ensuring your structure handles snow loads and wind uplift. Finish with clear sealant or dark stain to preserve the wood’s authentic character while protecting against moisture infiltration.
[affiai keyword=”rustic wooden entrance awning” template=”carousel” count=”3″]
Metal Awning With Brackets
Steel canopies with exposed bracket systems deliver architectural definition through geometric precision and material honesty. You’ll find these structures showcase clean lines where form meets function, with visible hardware becoming integral to the design rather than concealed afterthoughts.
Select metal finishes strategically—powder-coated aluminum resists corrosion in coastal environments, while bronze develops protective patina over time. Black matte surfaces create contemporary contrast against brick or stone facades, whereas brushed stainless steel complements modern minimalist architecture.
Installation tips require careful load calculations. Mount brackets directly into structural framing, not siding alone. Space support points every 24-36 inches for ideal weight distribution. Confirm minimum 8-inch projection depth for adequate weather protection. Pre-drill mounting holes to prevent material stress fractures. Pitch the canopy forward 15-20 degrees for proper water runoff.
[affiai keyword=”metal awnings with brackets” template=”carousel” count=”3″]

Premium Galvanized Steel Construction – Built from heavy-duty galvanized steel with a durable powder-coated finish, this awning delivers excellent rust resistance, reliable weather protection, and long-lasting outdoor durability.

Product Features:Restore the functionality of your awning by replacing your worn or broken awning arm mounting bracket.Works with many models of campers and trailers, Please confirm your size before buying.

Premium Galvanized Steel Construction – Built from heavy-duty galvanized steel with a durable powder-coated finish, this awning delivers excellent rust resistance, reliable weather protection, and long-lasting outdoor durability.
Victorian Decorative Trim Overhang

Ornamental gingerbread trim transforms period-appropriate porticos into statement pieces that honor 19th-century craftsmanship while protecting your entrance from the elements. You’ll find these overhangs feature intricate spandrels, turned posts, and corbels that showcase Victorian elegance through detailed millwork patterns.
The structural design typically extends 36-48 inches from your façade, supported by ornately carved brackets positioned at 24-inch intervals. Decorative accents include filigree valances along the edge, creating shadow lines that enhance architectural depth. You can specify materials ranging from traditional painted wood to modern PVC reproductions that maintain authentic profiles while resisting weather deterioration.
Install coordinating porch columns beneath for visual continuity, ensuring your overhead dimensions proportionally match your doorway width—typically 1.5 times wider than the door frame.
[affiai keyword=”victorian decorative trim overhang” template=”carousel” count=”3″]
Asymmetrical Sloped Roof Overhang
While traditional overhangs maintain symmetry, an asymmetrical sloped roof design creates dynamic visual interest by extending one side farther than the other—typically projecting 48-72 inches on the dominant slope versus 24-36 inches on the shorter pitch. This asymmetrical design directs attention to your entrance while establishing distinct spatial zones beneath the overhang.
You’ll achieve ideal roof aesthetics by aligning the longer slope with your door’s swing direction, creating natural shelter where you’ll stand while disengaging. The contrasting pitches—often 6:12 on the extended side versus 4:12 on the abbreviated—generate shadow lines that emphasize depth and dimensionality throughout the day.
Position support posts at the longer projection’s terminus to maintain structural integrity without compromising the design’s intentional imbalance. This configuration transforms your entry into an architectural focal point.
[affiai keyword=”asymmetrical sloped roof overhang” template=”carousel” count=”3″]
Dutch Door Integrated Overhang
When you integrate a Dutch door with its overhang, you’ll create a unified architectural element where the split-door configuration demands specific clearance parameters—the upper leaf requires 18-24 inches of projection when opened to 90 degrees, while the lower section establishes the threshold’s weather protection boundary.
Your functional design must account for operational zones. The upper Dutch door half needs unobstructed swing space beneath the overhang’s soffit, requiring minimum 7-foot clearance from threshold to underside. Position the overhang’s leading edge 36-42 inches forward to shield both door sections during rain while maintaining proper ventilation.
The lower half’s closure creates a ventilation opportunity—your overhang depth should extend sufficiently to prevent water intrusion when only the bottom section remains closed. Consider fascia depth matching your door’s total width for visual proportion.
[affiai keyword=”dutch door overhang design” template=”carousel” count=”3″]